The Crazy Hat Box

there's a hat for that!

The Cakeless Birthday

Cake.  It’s the traditional birthday food.  You put candles on it.  You eat it with ice-cream.  If you’re going to a birthday party, you can always count on cake being there.

But what if you (or your kids) don’t like cake?

I know it sounds unbelievable that any kid wouldn’t like cake, but mine don’t.  They never have.  For their first few birthdays, I still made cake or cupcakes because that’s what you do for birthdays.  I’d serve the cake to the guests, and give the birthday boy Oreos or Reeses for his dessert – what he really wanted. But then I thought, why make something they don’t like (as cute as those cakes and cupcakes were)?  It’s THEIR birthday, and who says we HAVE to have cake?  So, I started coming up with alternatives.

Sugar Cookies

My oldest son loves sugar cookies, so that’s been his birthday dessert of choice for the last two years.  They are a great alternative because you can find cookie cutter shapes for almost any theme!  An added bonus is that my kids love to help make sugar cookies, making it a fun pre-birthday party activity to do together!
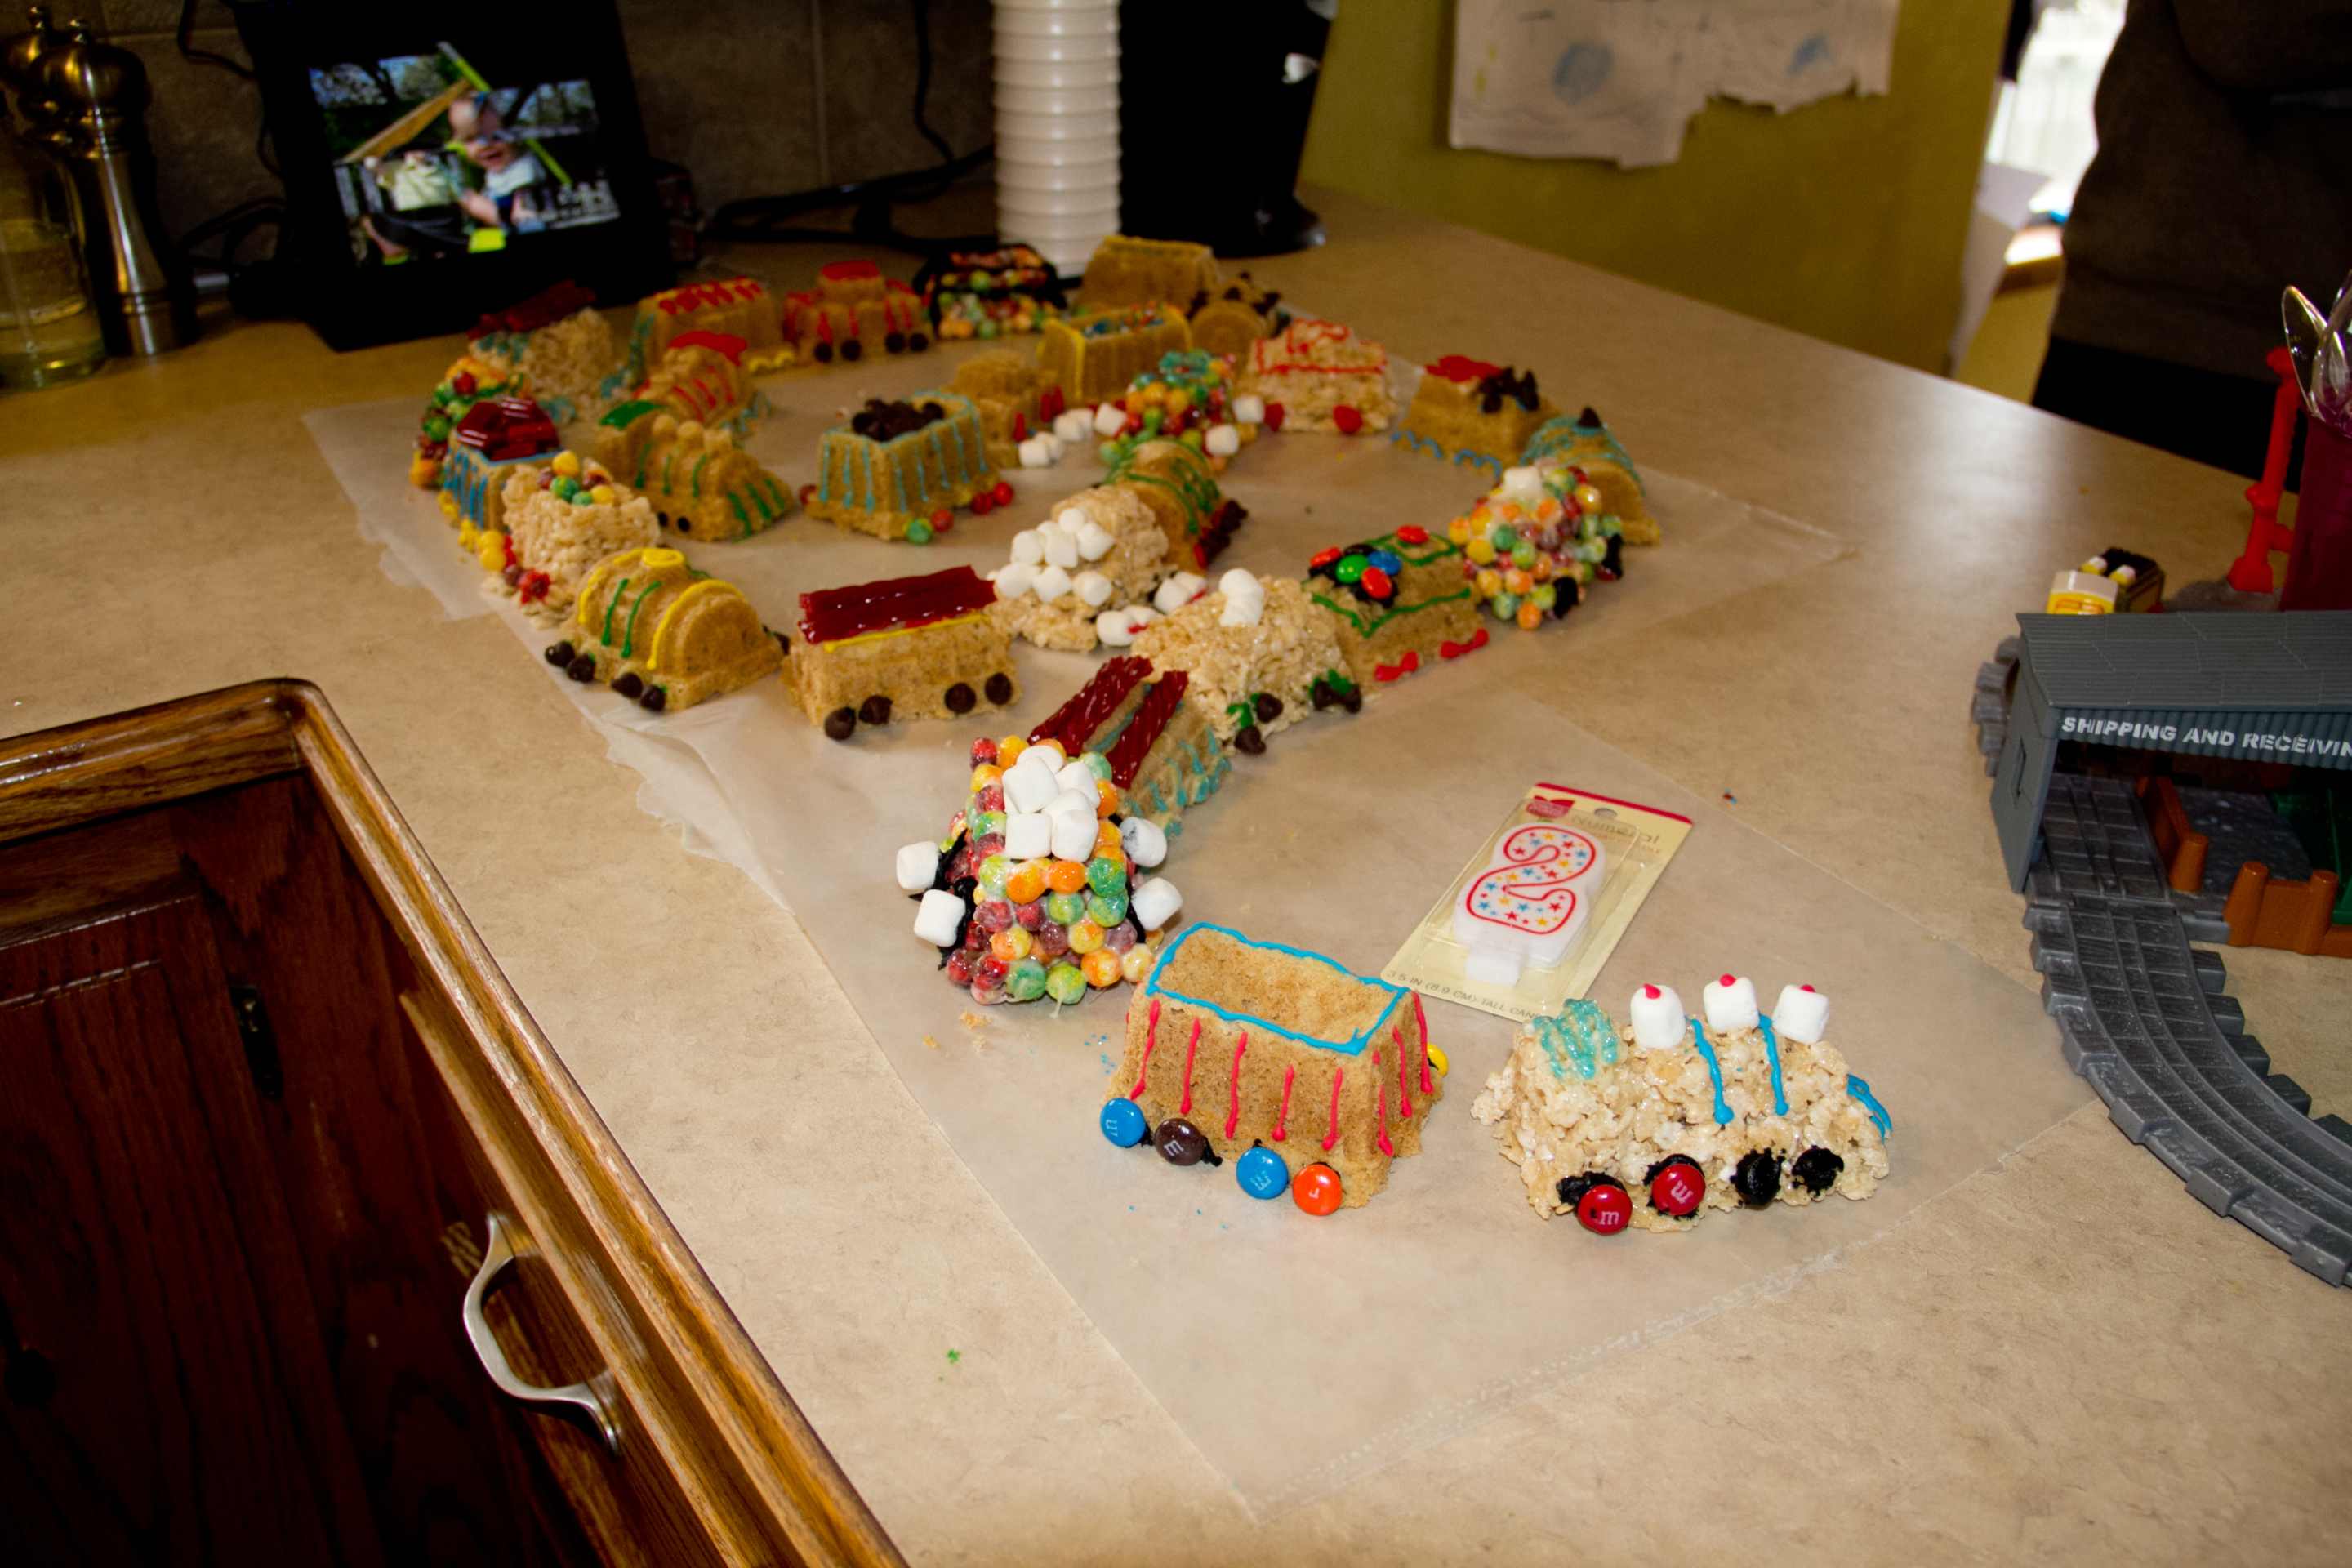
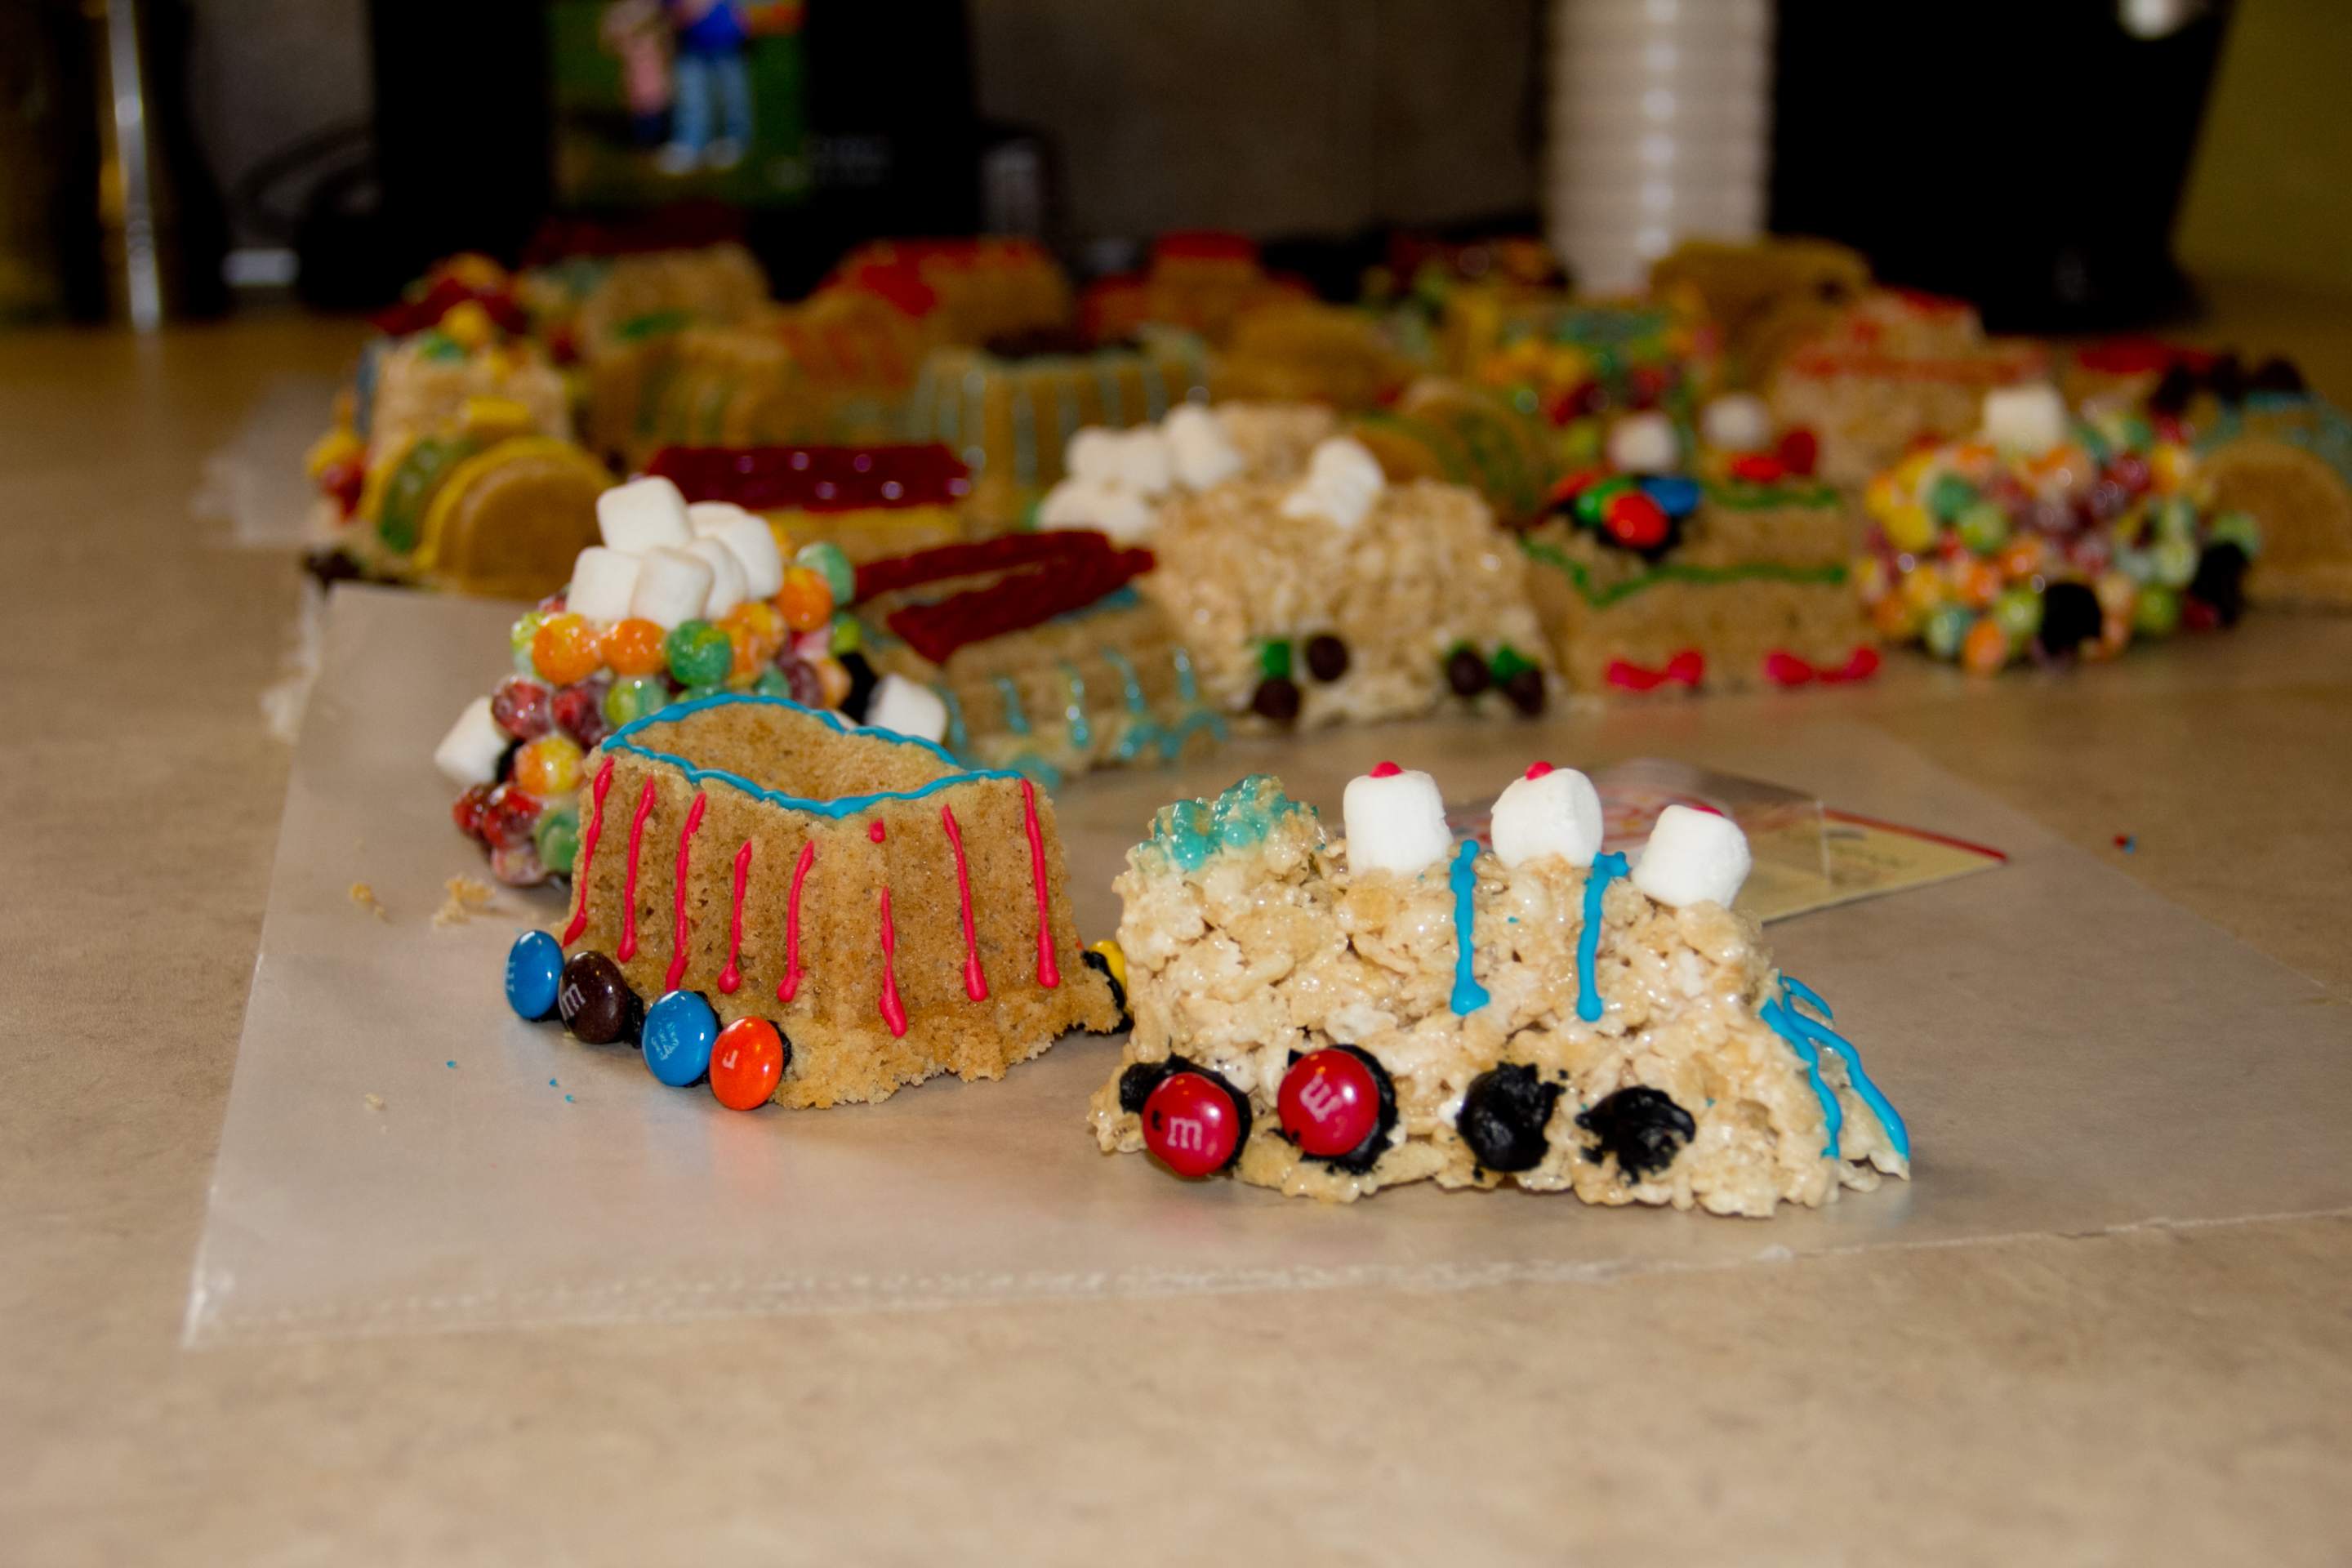
image007

image009


Rice Krispie Treats

I love this option because you can mold Rice Krispie Treats into any cake pan and decorate it with icing like a cake!  And, you can even add some variety and make them with other kinds of cereal – in this case, I also used Trix.  This is a great option, too, if you’re worried about kids with milk allergies (but in this case you’d probably have to omit the icing).
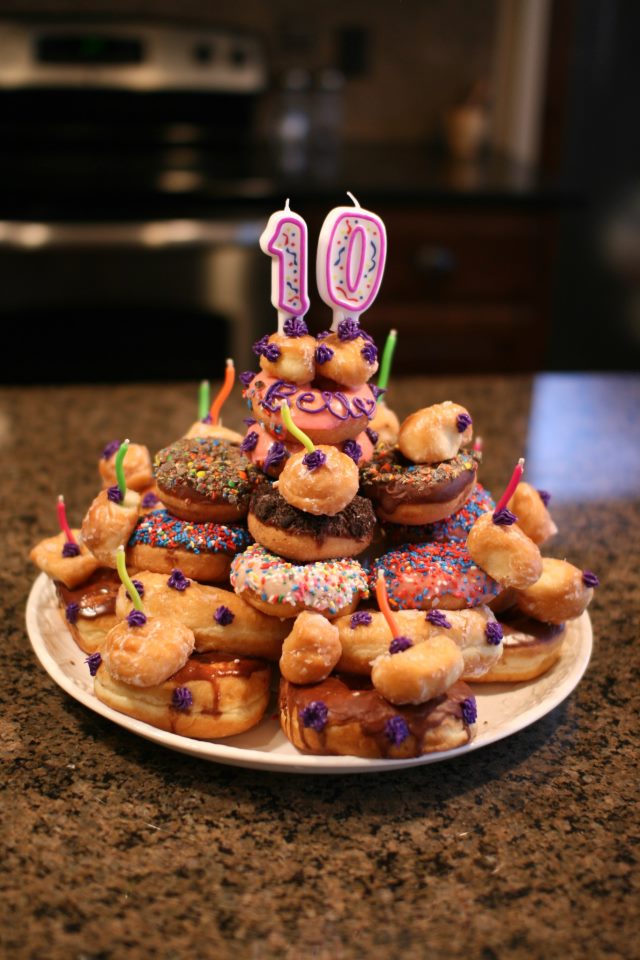
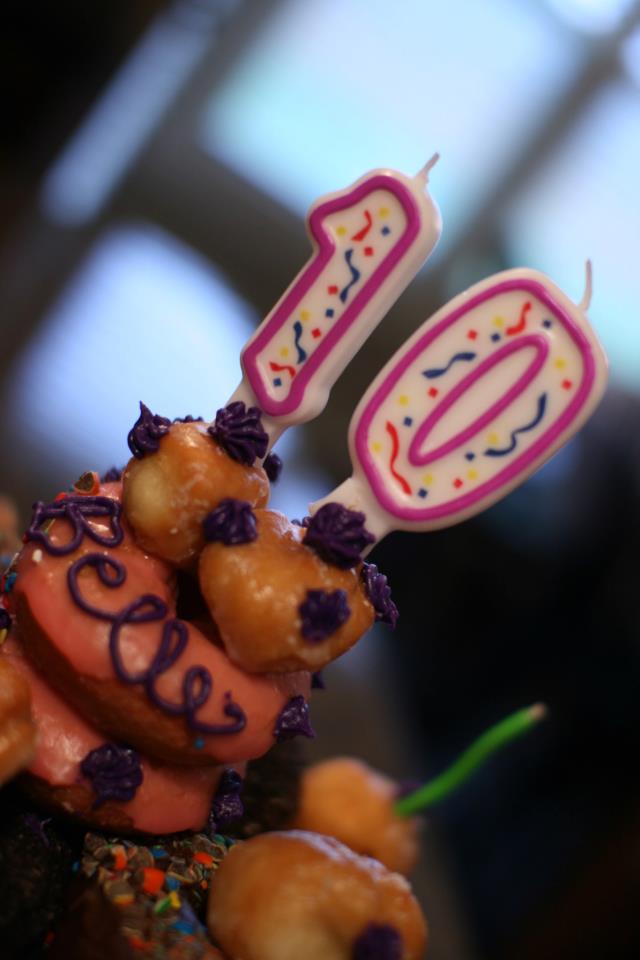
image003

image004


Donut “Cake”

Technically, donuts are kind of a form of cake, but that deep-fried goodness somehow makes them so much better (and magically makes them ok to eat for breakfast).  I love this because you can stack them like a cake, add icing to decorate them like a cake, and they’re already separated into portions.  And, you can get several different kinds so that everyone is sure to find something they like!
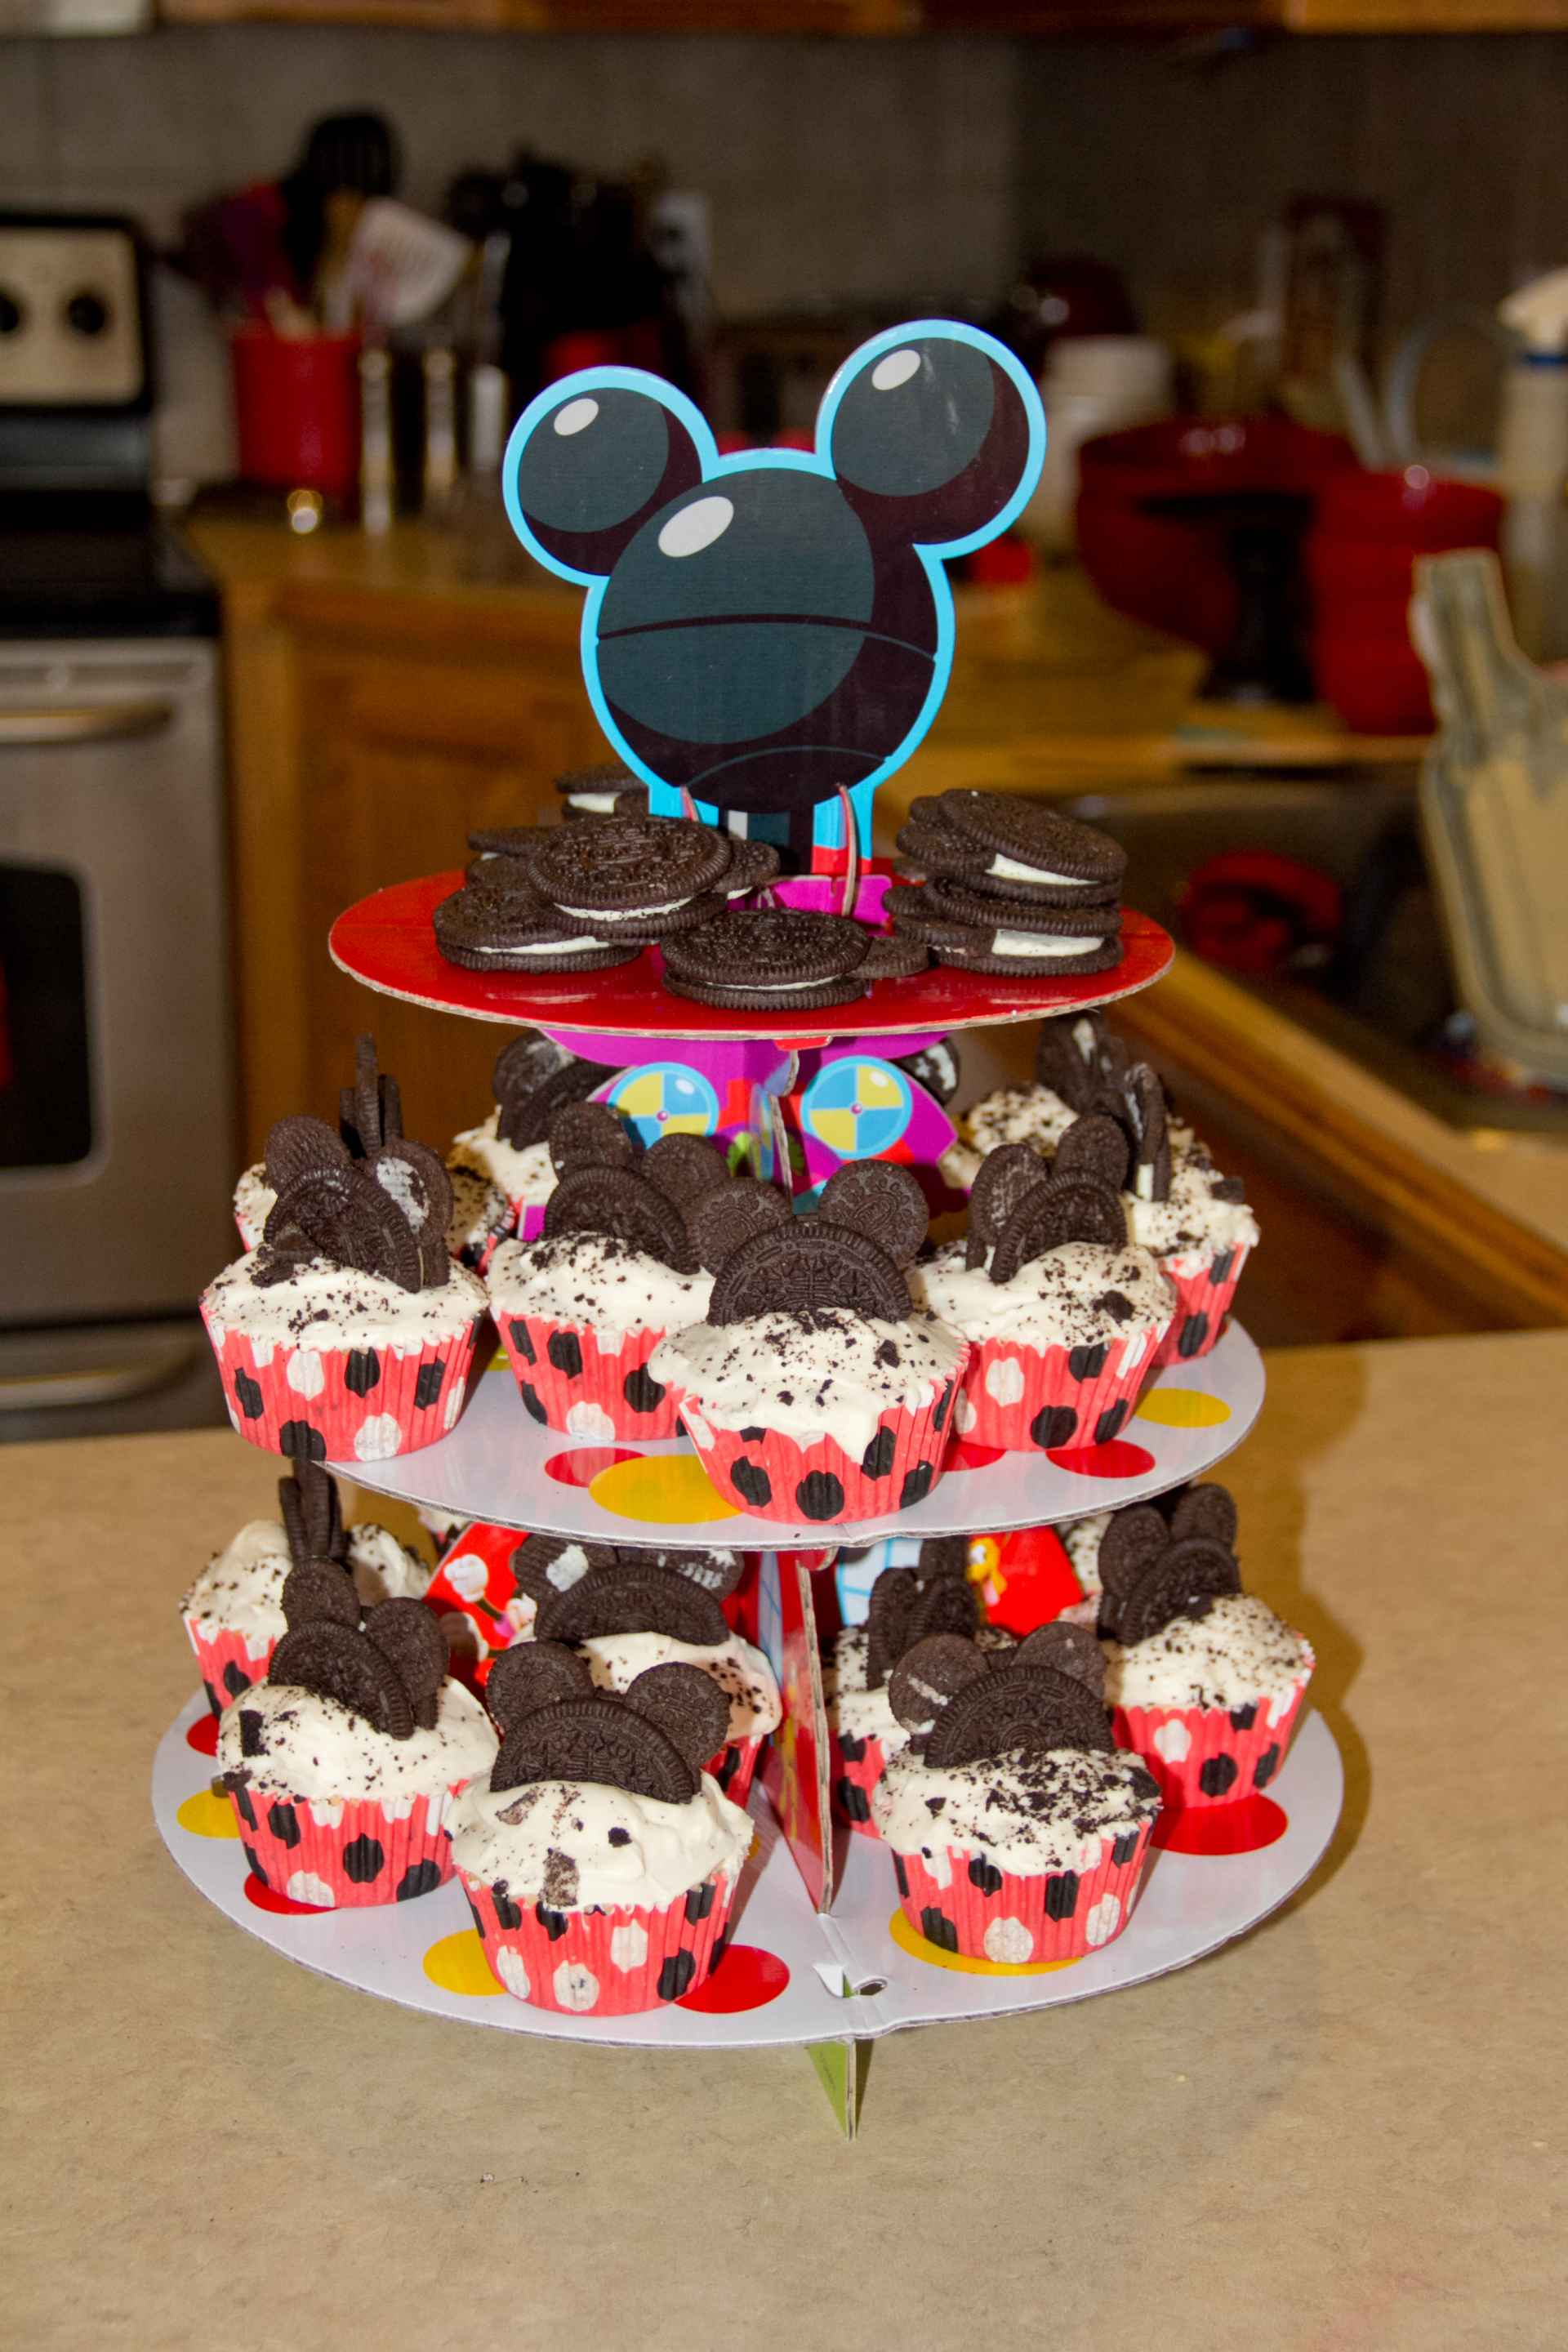
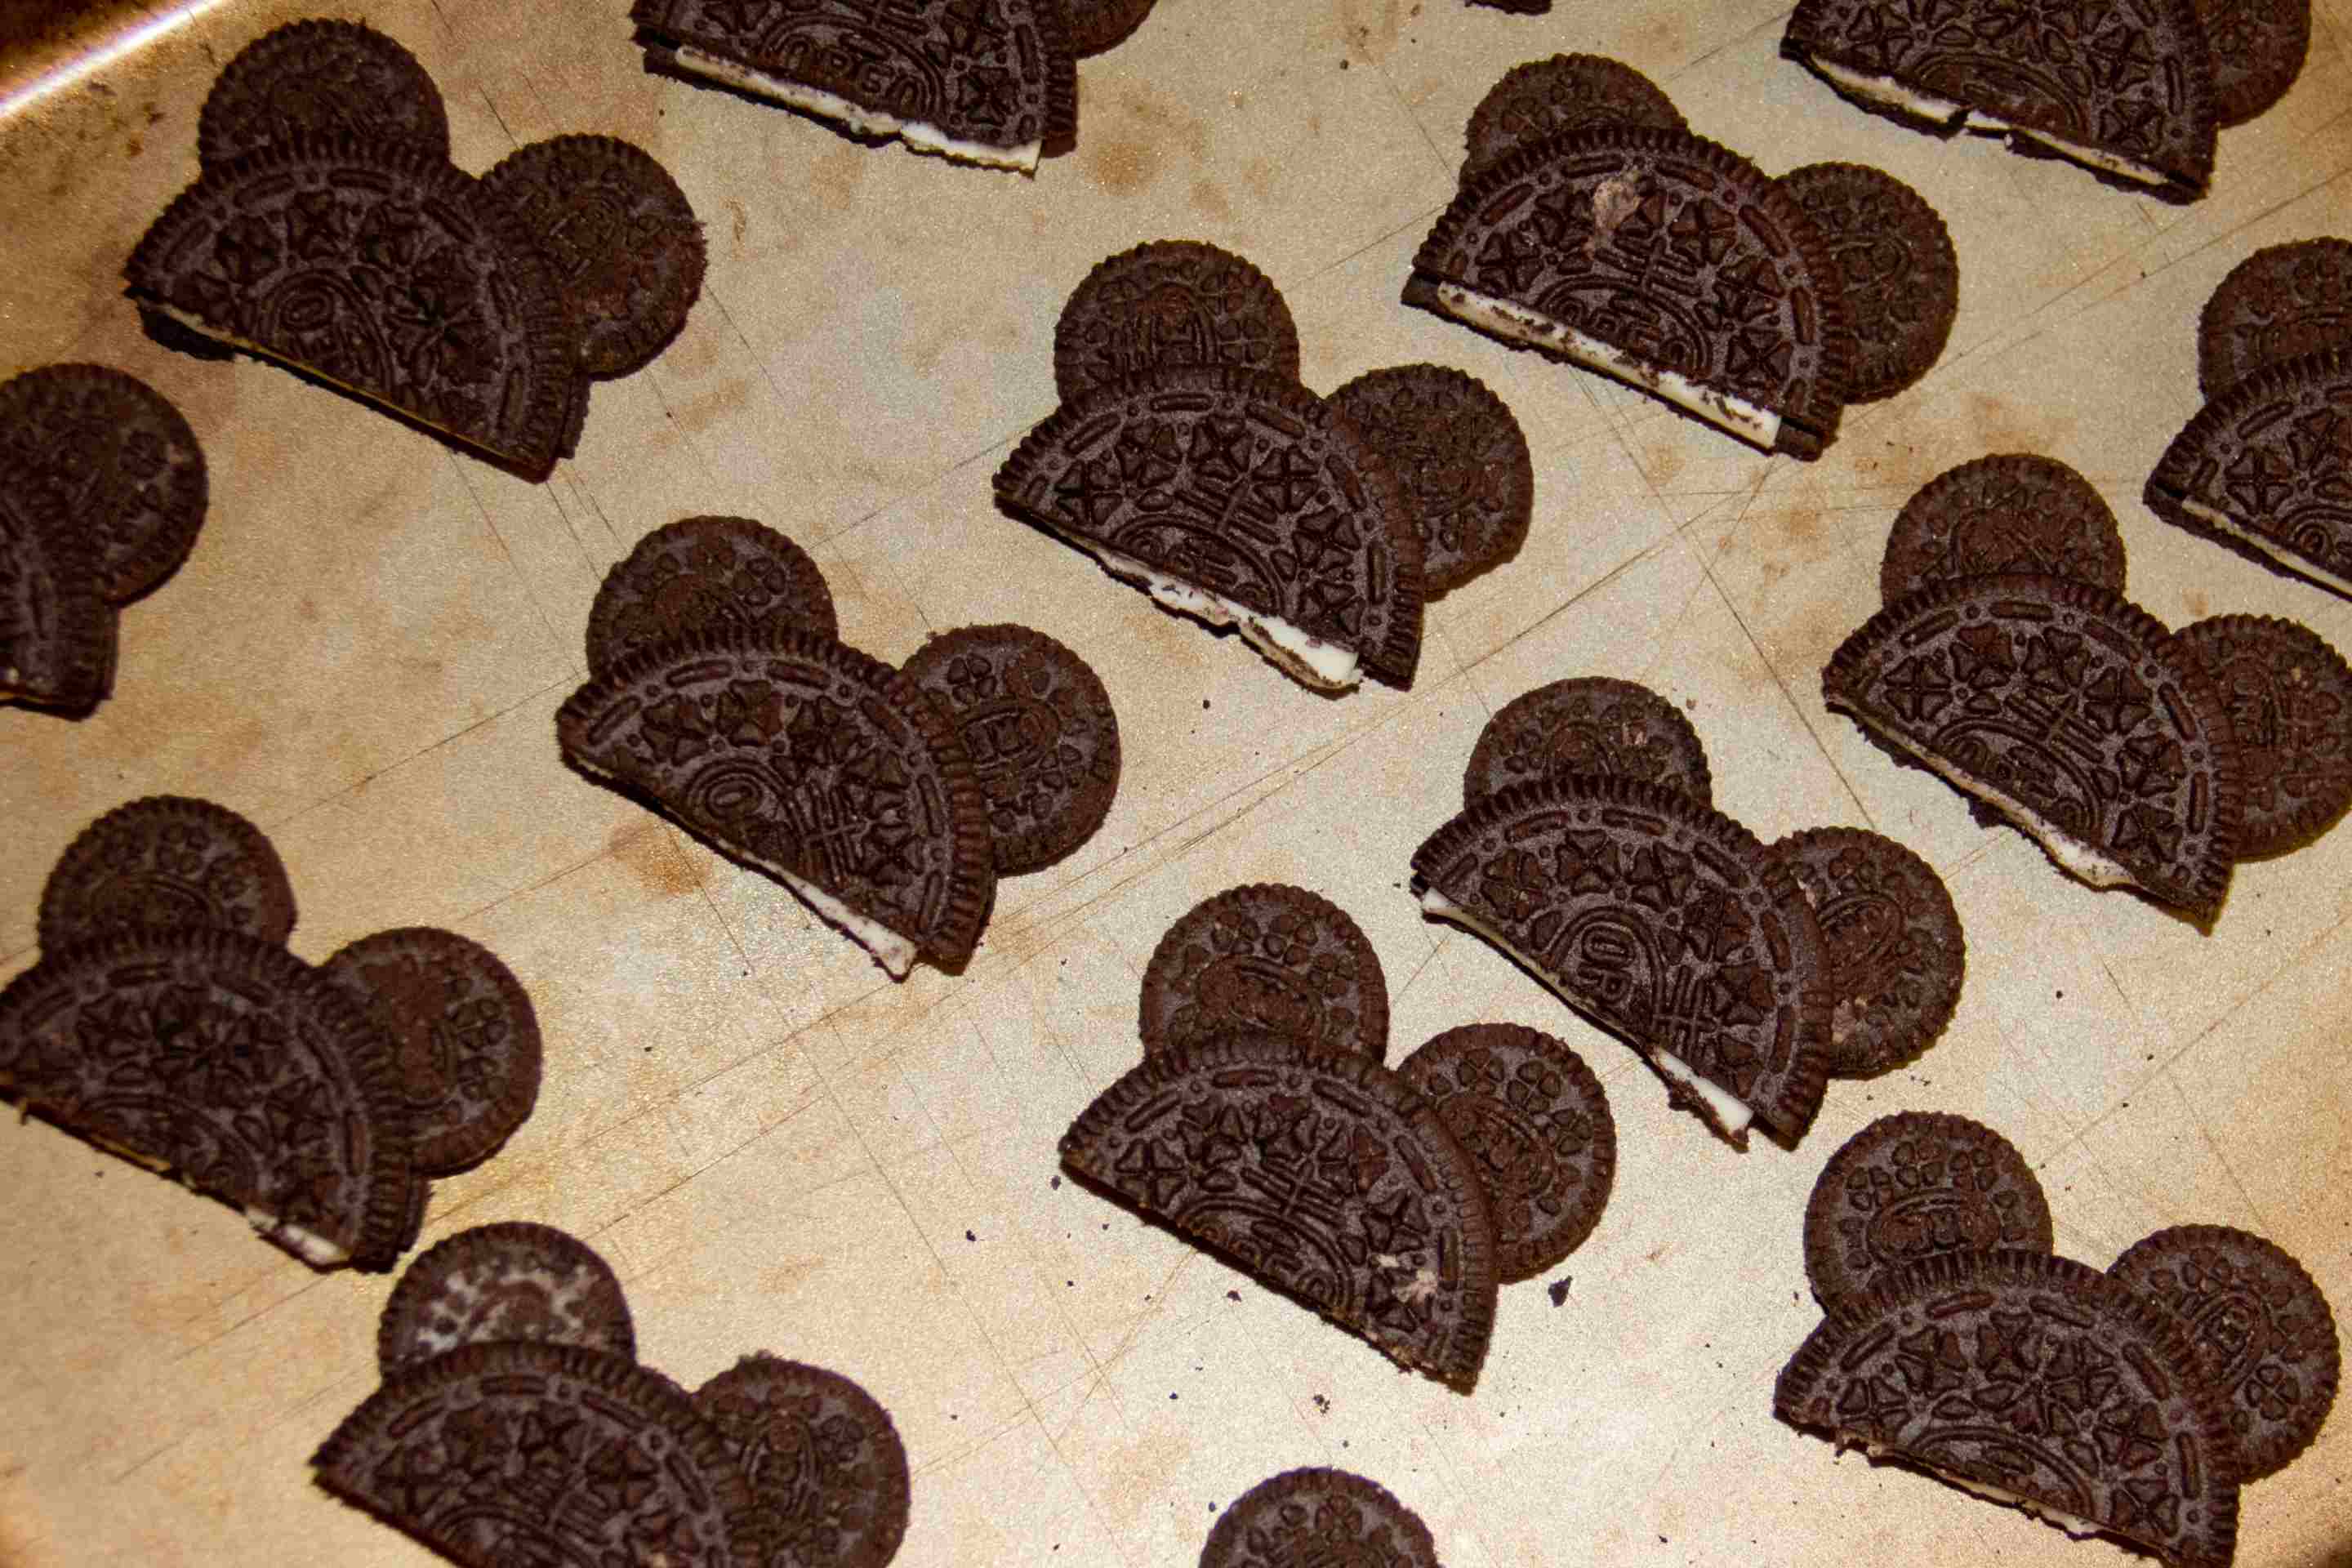
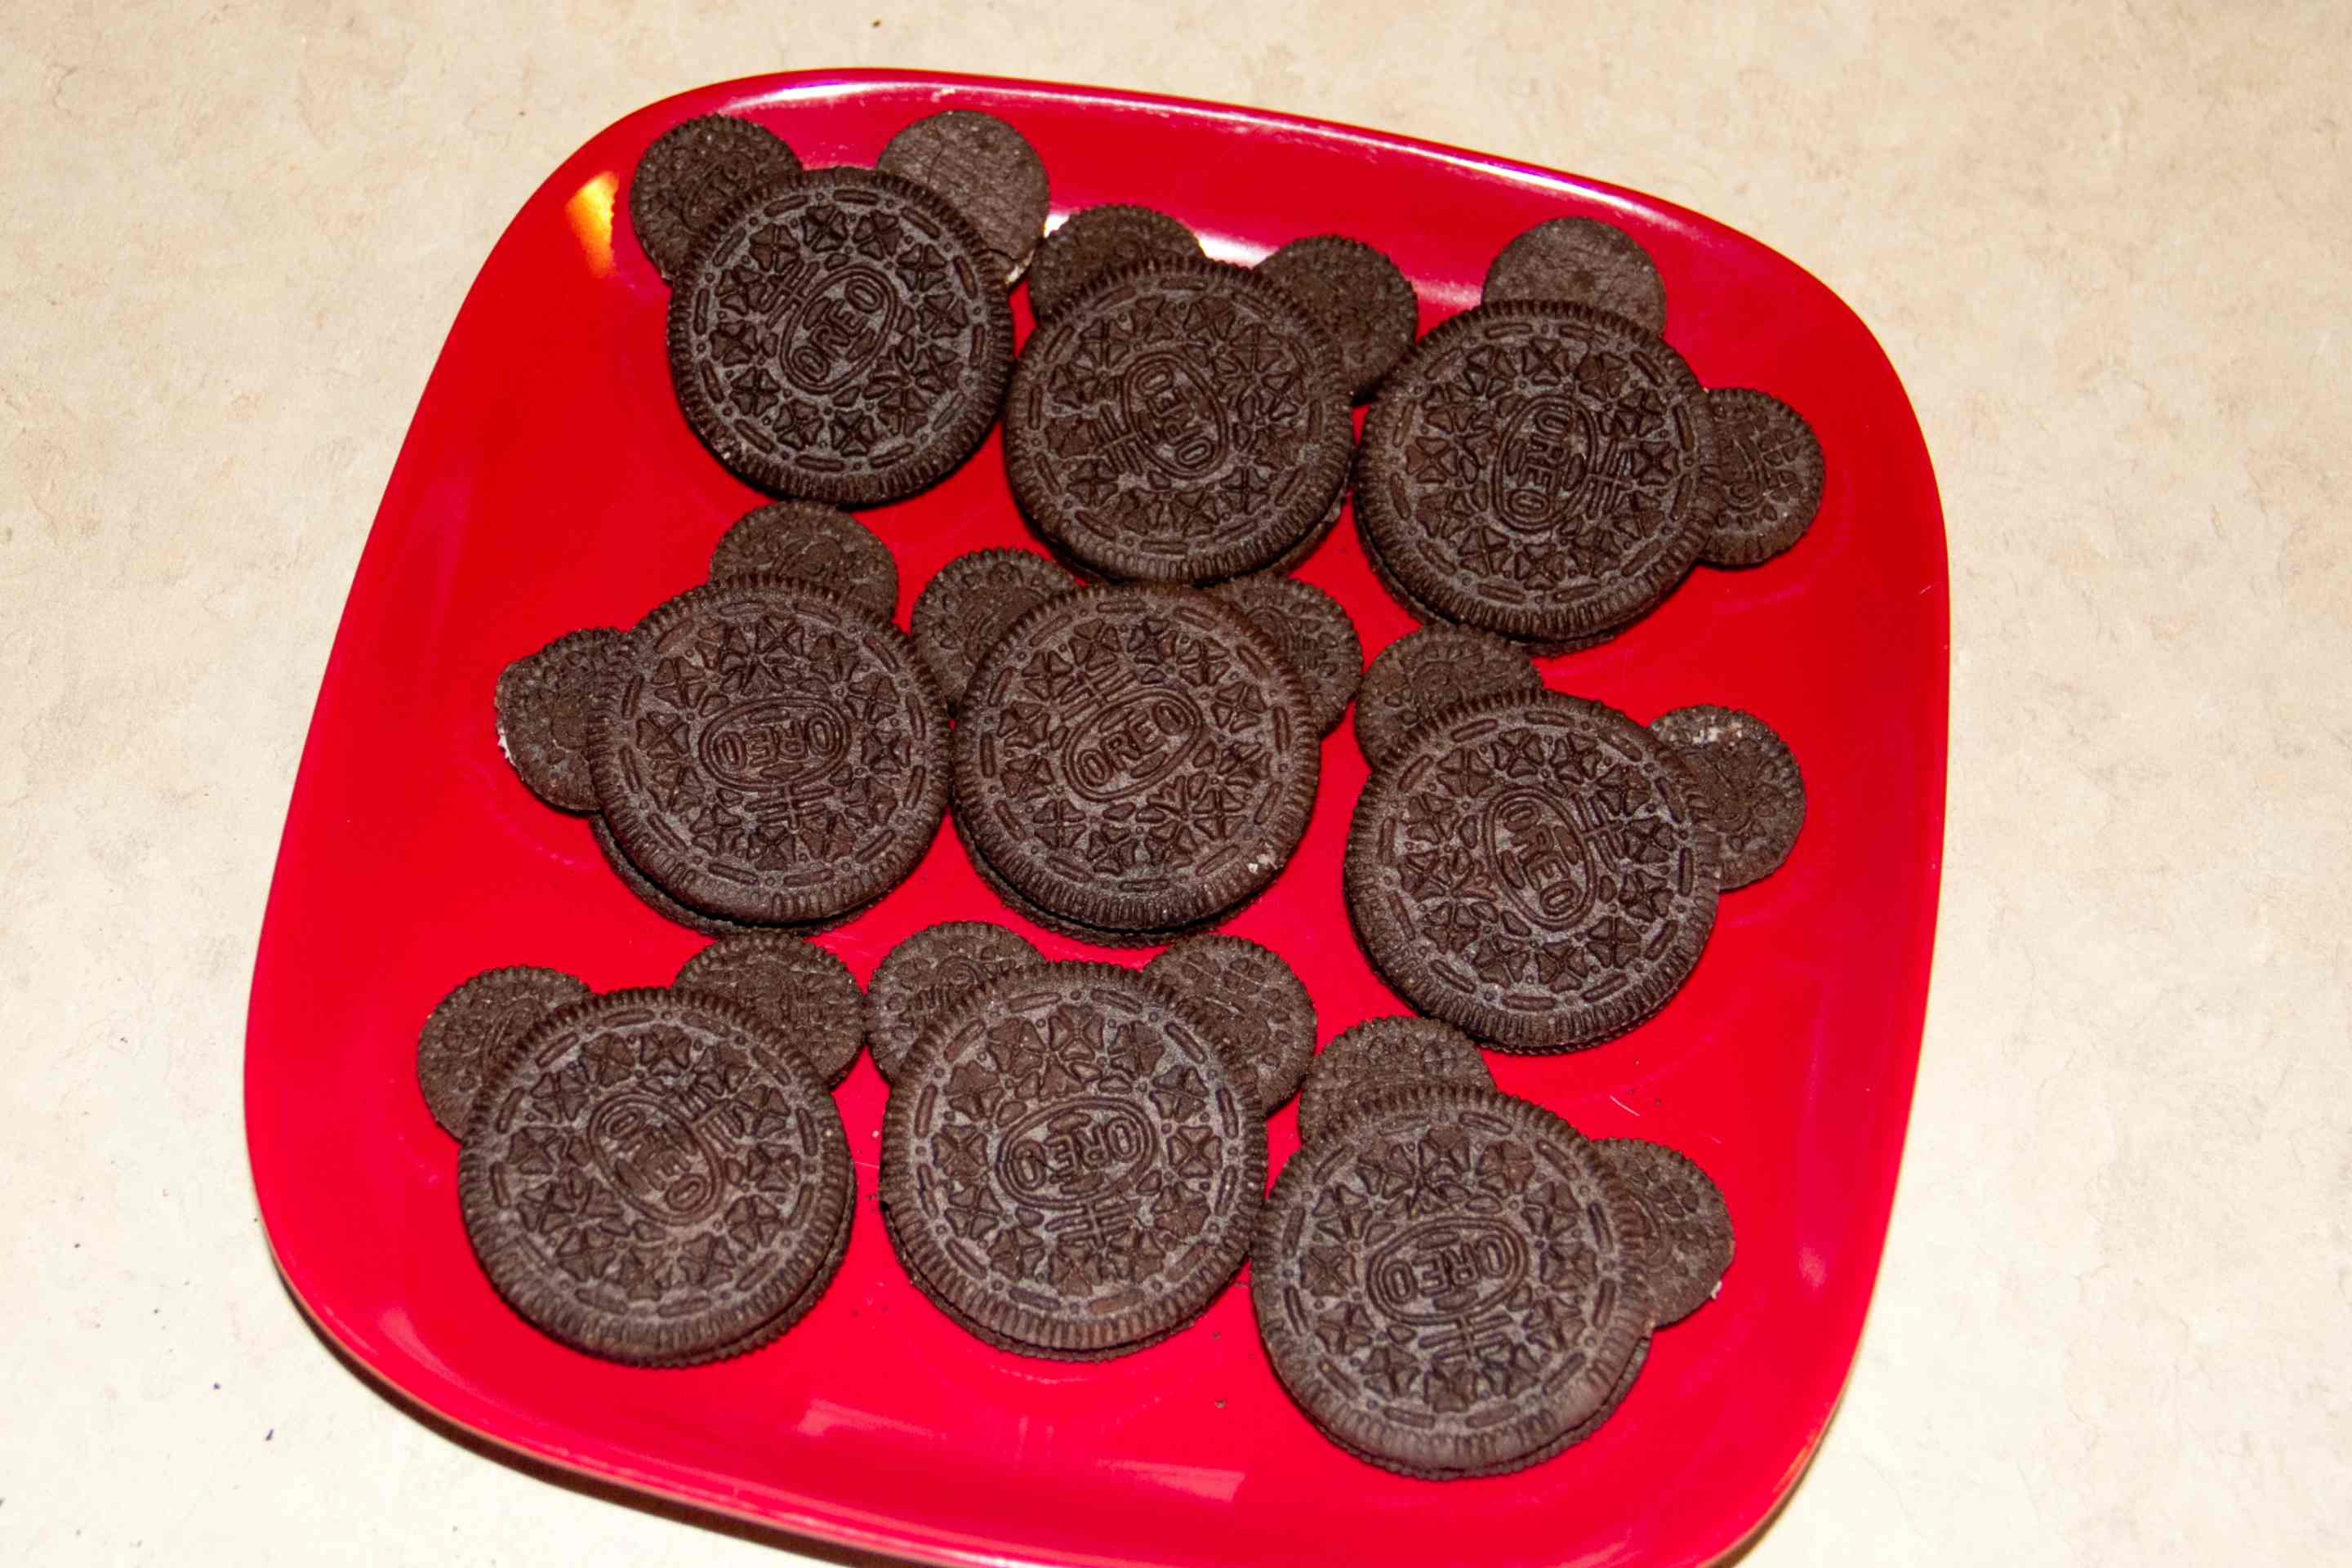
DonutCake

DonutCake2


Oreos

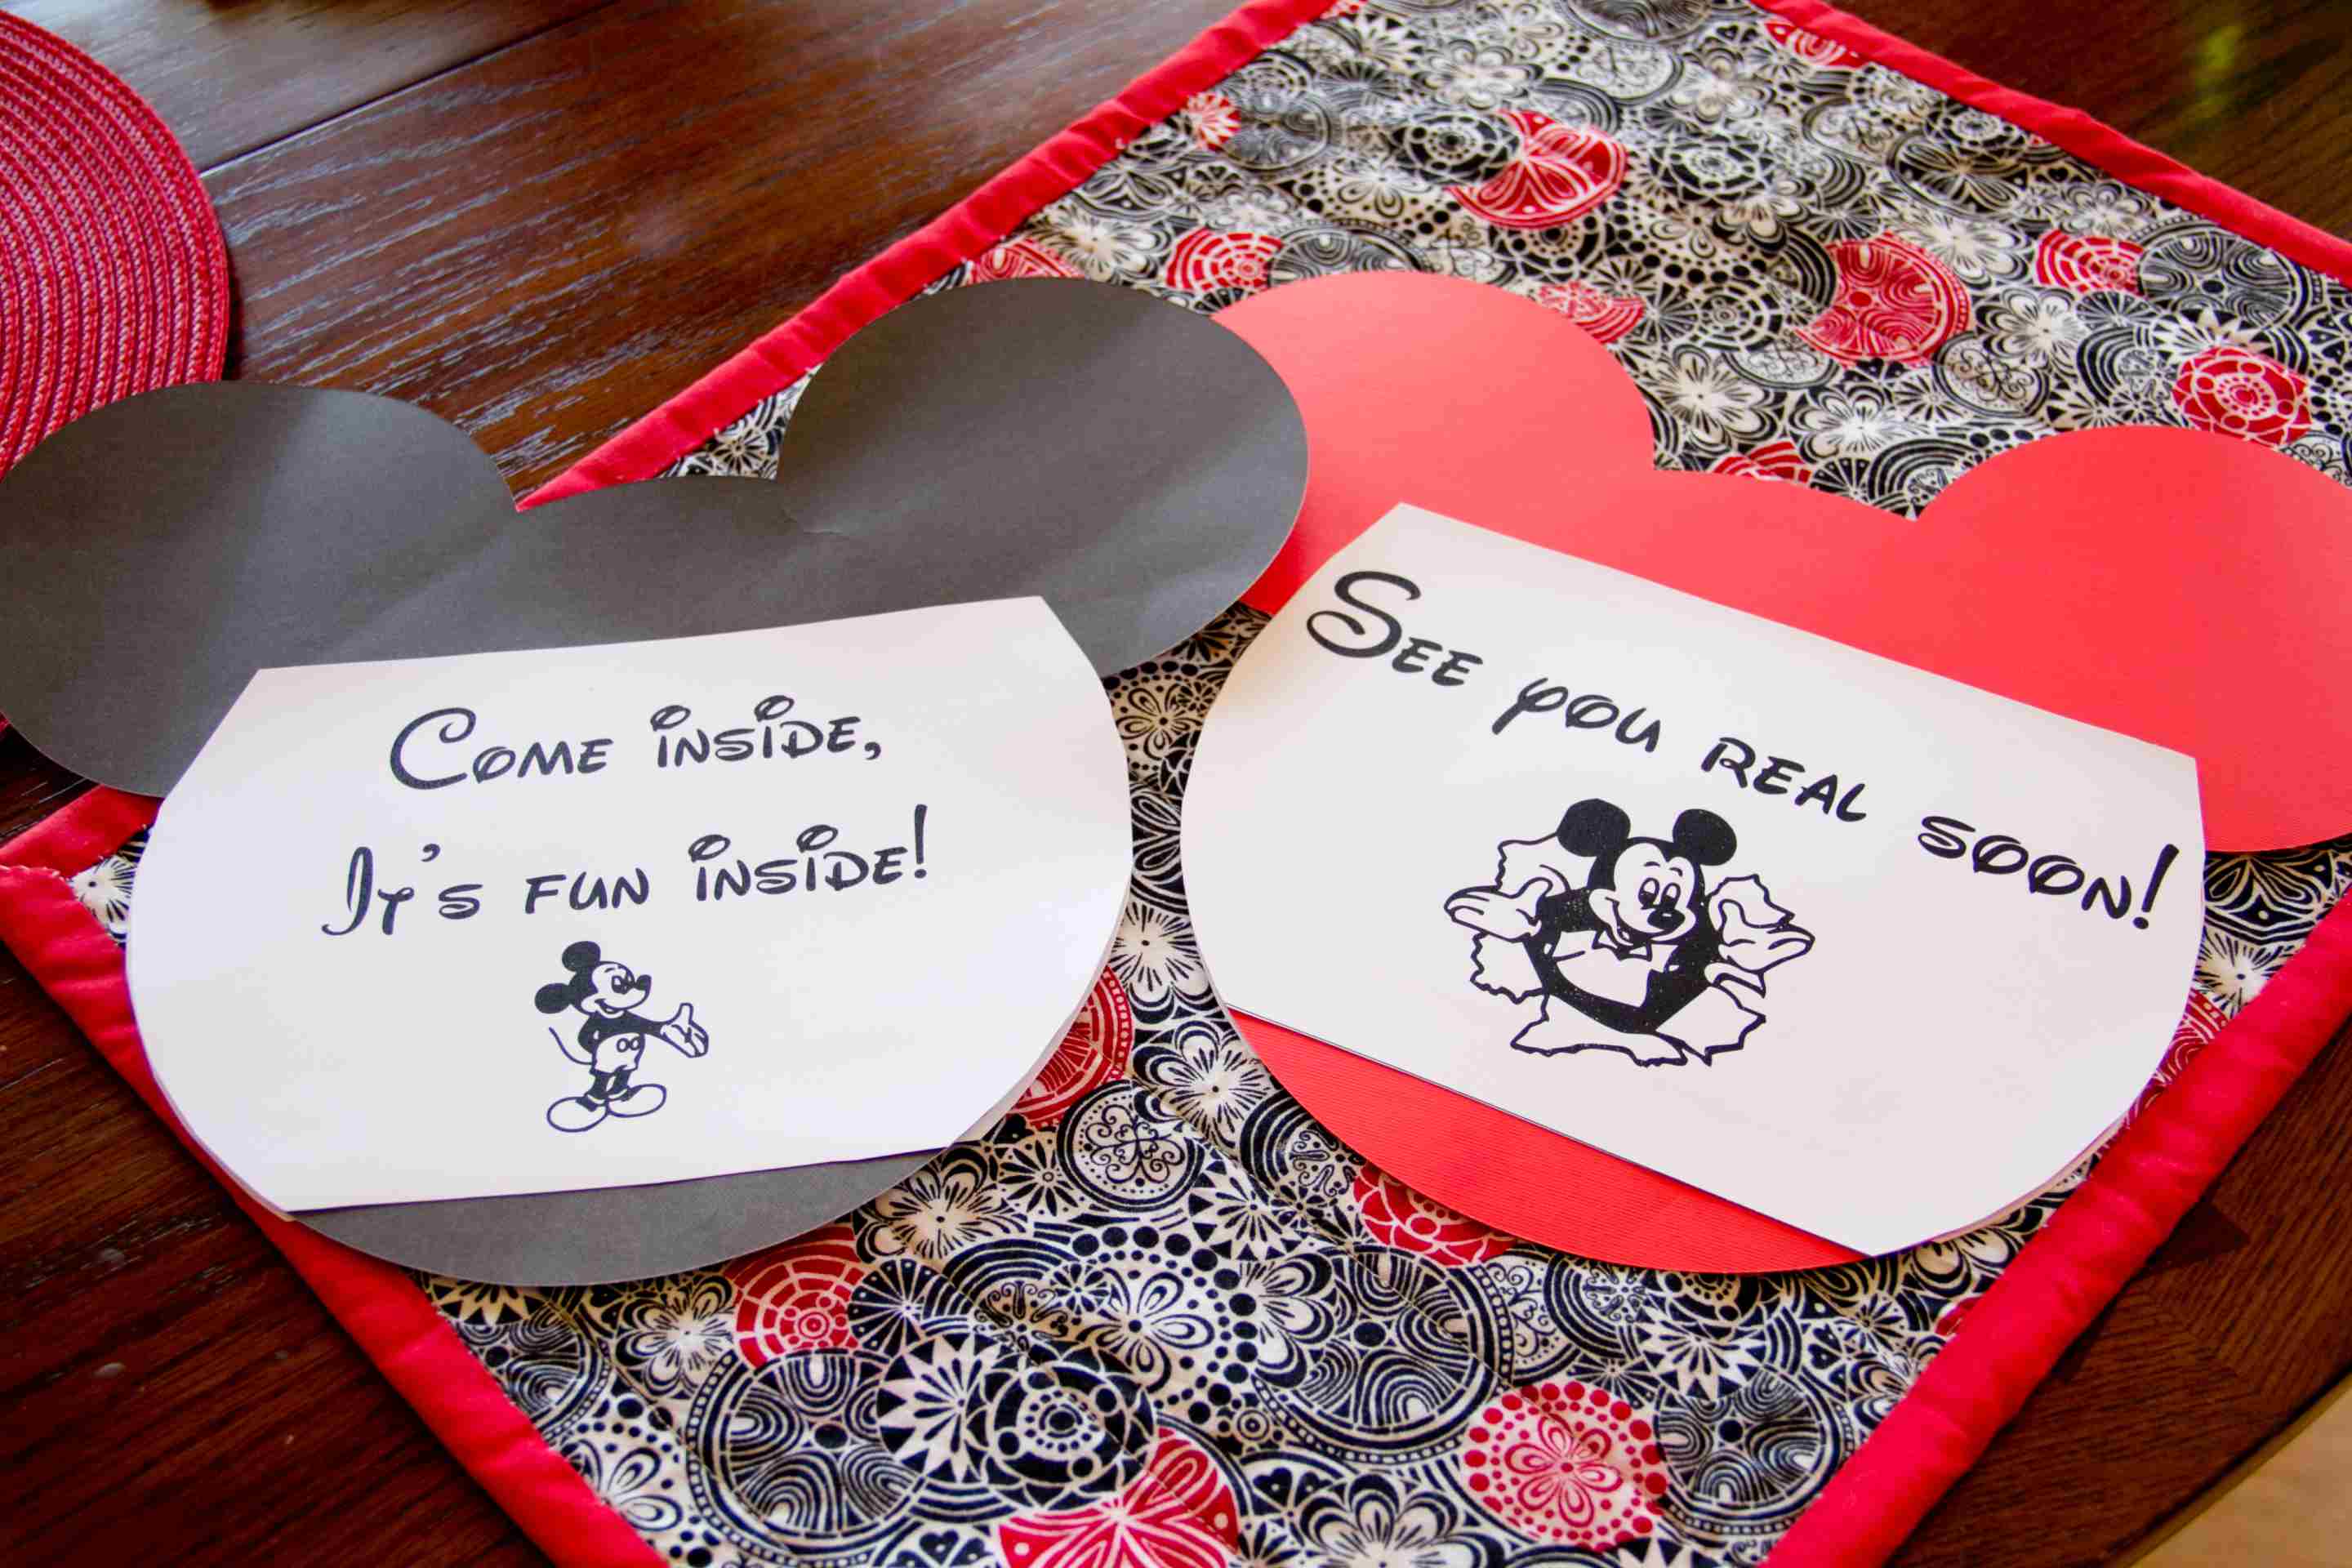
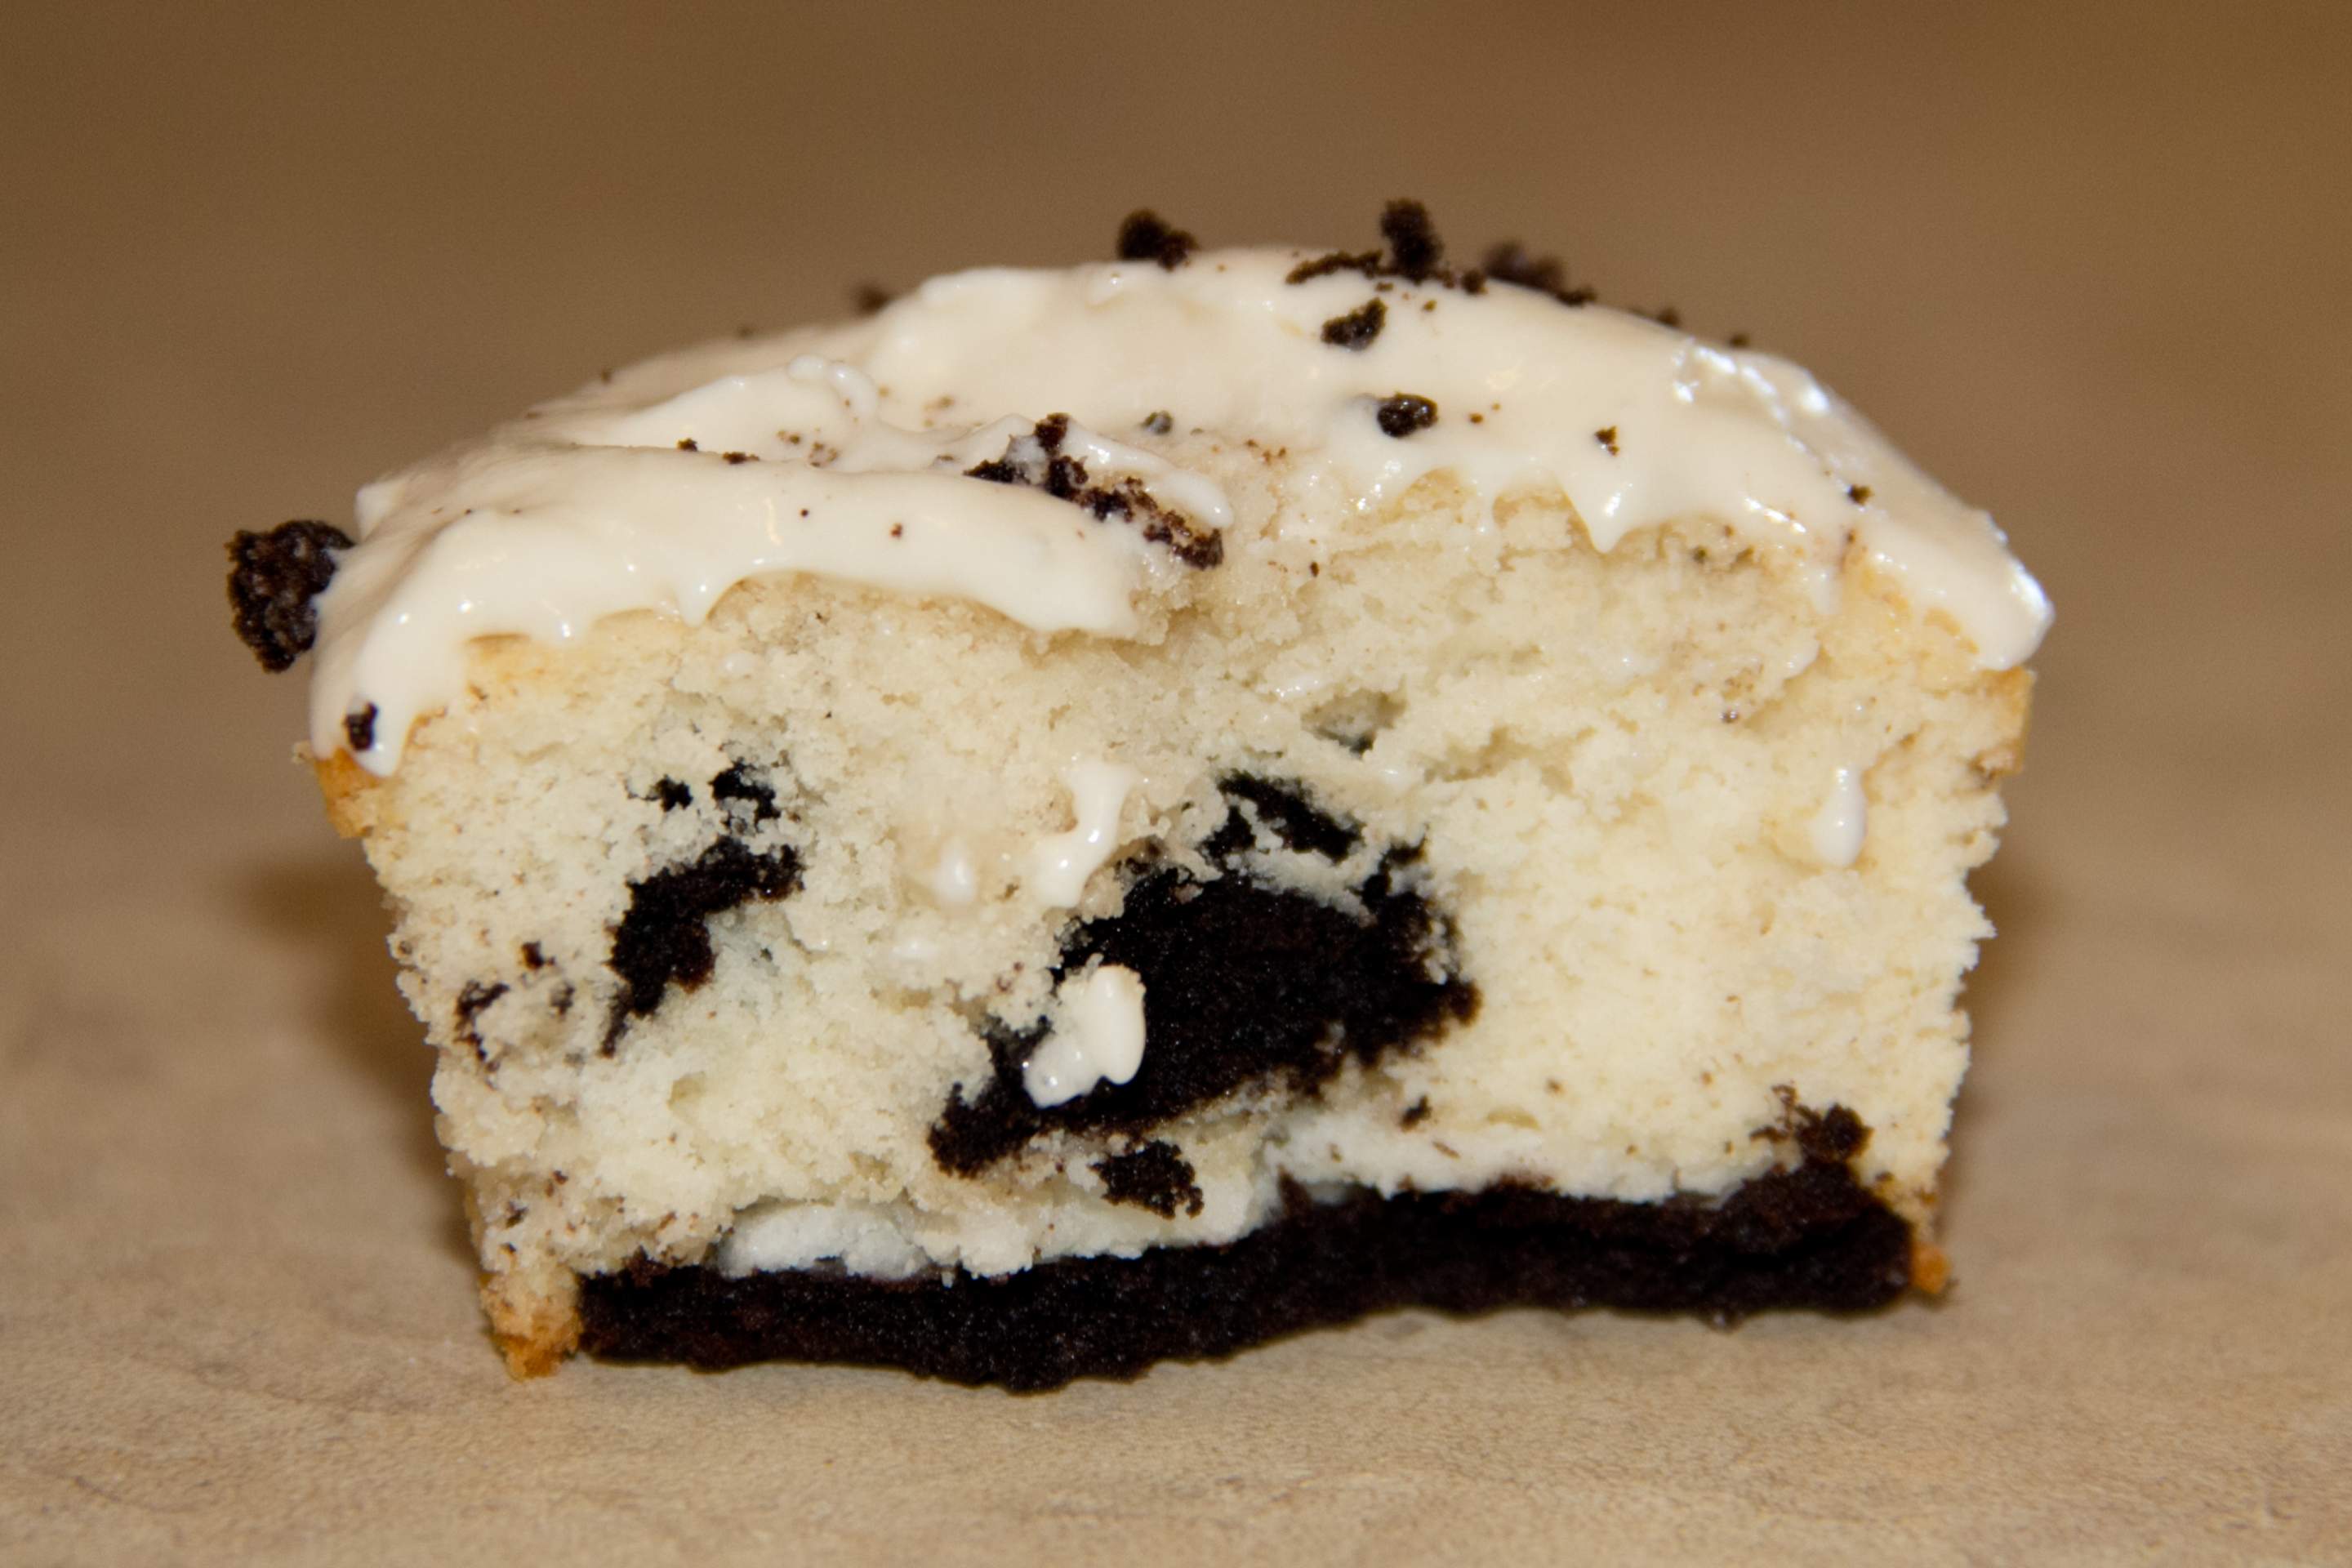
For my youngest son’s last birthday, I made Cookie’s ‘n Cream cupcakes, but I reserved some of the plain Oreos for non-cake lovers.  Since he had a Mickey Mouse birthday party, I made the Oreos look like Mickey, so they went perfectly with the theme!

image011


For your next party, don’t be afraid to think outside the cake pan!  Be creative!

Leave a comment »

DIY Tomato Cages

Last year, I grew a lot of tomatoes.  I wanted to make my own tomato sauce and salsa and tomato soup (which were all delicious, by the way, if I do say so myself), so I planted 10 tomato plants.  The only problem was that I did not have 10 tomato cages.  I didn’t want to spend the money on that many cages, so I just planted them, and let them kind of vine along the ground.  It didn’t work well.  The tomatoes that were touching the ground rotted fast and the ones that weren’t rotten were eaten away by roly polies.  While I did salvage some of my harvest, it would have been nice not to have to deal with the problems.

This year, I am once again growing a lot of tomato plants, but I had to come up with a better solution.  So, I took a cue from my Dad and made my own!  It’s so much cheaper than buying bunch of cages, and they work just as well.  Here’s how:

What you’ll need:

  • Wire garden fencing
  • Heavy-duty wire cutters
  • Pliers

You’ll need some garden fencing.  The kind of garden fence you get depends on you.  Choose the height based on your preferences.  A common height is 48 inches, which is a great height for a tomato cage.  I got my fencing from my father-in-law, who had some left over, and it was a little tall (about 5 feet), so I had to trim it down.  How much fencing you get is dependent on how many cages you want to make and how big a diameter you want for your cages.  In my case, I used about 5 1/2 feet of fence per cage.   FYI, 50 ft of 48-inch-high fence will run about $50 at your local hardware store; that’s about 9 cages at $5.55 per tomato cage.  Big tomato cages will run anywhere from $8 to $12 per cage at your local garden center.

First, using wire cutters, cut the length of your cages from the roll (again, I used 5.5 feet per cage), making sure to leave one side with longer, unconnected ends.

20140428_101558


Next, cut the bottom, horizontal strip of wire off, leaving the spoke-like ends that you will push into the ground to keep your cage stable.  I had to cut my fence down because it was so tall, but if you bought fencing at just the right height, just cut off the very bottom wire edge (in the picture, I’ve flipped my cage upside-down, so I’m actually cutting off the top).

20140428_101117


Next,using pliers, wrap the ends you left on one side when you cut the length of fence around the the other side, making the fence into a circle.

20140428_102002


And that is literally all there is to it.  Now, plant your tomatoes, push your new cages into the ground around it, and watch them grow!

20140428_102436 20140428_103956

1 Comment »

M-I-C-K-E-Y P-A-R-T-Y

There are some days that I think will never end, but when I look back over the years, they seem so quick!  How are my babies growing so fast?  A friend of mine likes to say “the years are short, but the days are long”.  So true.

My baby turned three this month.  THREE!  How is that possible?  Even though I’m always in disbelief at how big they’re getting, I love my kids’ birthdays.  They are so fun!  Every year, we have themed birthday parties for the boys.  We’ve done  a tractor theme, a monkey theme, Very Hungry Caterpillar theme, Cars…  you get the idea.  This year was the first year that little boy was able to pick his own theme, and, since he’s recently become obsessed with Mickey Mouse (if I have to watch Mickey Mouse Clubouse Road Rally one more time, I may get physically sick), he picked a Mickey Mouse party.

There are so many amazing ideas on Pinterest for all kinds of birthday parties – and Mickey Mouse-themed parties are no exception.  So, armed with tons of ideas from Pinterest, along with a menu provided by my Sister-In-Law (who did a Mickey and Minnie themed party for her kids last year), I created a party.  Here are the results.  It was so much fun!

IMG_9083

Signs for the front and back doors.  I found FREE printables for them here.  I glued them onto Mickey shapes I cut out on my Cricut.

IMG_9078

 Mickey Mouse straws from Amazon and a red Solo cup that I glued white ovals on to make it look like Mickey’s pants!

IMG_9102

The main course was, of course, Hot Dog, Hot Dog, Hot Diggity Dogs!

IMG_9094

“Minnie” carrots and jicama with Donald and Daisy dill dip.

IMG_9097

“Chip and Dale” chips and dip with “Goofy” guacamole.

IMG_9103

“Pete’s” pickles (they’re actually my mom’s pickles – she makes the best!).

IMG_9100

And don’t forget the “Mouseketools”!

IMG_9085alt

Every year, I set out note cards and pens so that friends and family can write the birthday boy a note.  Then, I put the notes in the boys’ scrapbooks, so they can see how much they’ve been loved over the years.

IMG_9200

My sweet friend, Kendel, brought all the kids Mickey suckers!

IMG_9147

And the main attraction – Mickey Mouse Cookies n’ Cream Cupcakes!  They were SO GOOD!  Here’s where I got the cupcake stand.

IMG_9082 IMG_9074

I got the recipe for the cupcakes and frosting from Annie’s Eats.  Then, I used Oreo halves and mini Oreos to make Mickey ears.  Just cut an Oreo in half (this works best if you use a serrated knife), then split a mini oreo in two, scrape off the frosting (which I used in the cupcakes – no need to waste!), and push them into your Oreo half.  So cute!

IMG_9156

The Mickey candles were another Amazon purchase, as were the cupcake liners.

IMG_9088

And Oreo Mickeys for those who don’t like cake (aka, my children – weird, I know).

It was a great party!

Leave a comment »

Herb Gardening Part 2 – Annual Herbs

Annual herbs, like their perennial counterparts, are easy to grow and maintain.  They do great in containers or in the ground; they’re tasty; they’re even pretty.  If you’re new to herb gardening, this is where to start.   Here are a few to consider:


Basil is my favorite!  It tastes so good with fresh tomatoes, but is so versatile, you can use it in pretty much any dish.  Need a quick meal?  Chop some fresh basil, cook it with ground beef, and add some cooked rice.  It’s so good – and easy.  The basil adds amazing flavor. You can also add a bunch of chopped basil to some olive oil to make your own pesto!  To keep it producing all summer, just use it often.  Cutting it back (make sure to pinch off the flowers when they start to bloom) makes it produce more!

IMG_9050

Dill is another of my favorites.  It is wonderful with cucumbers and with cooked carrots.  Make sure to cut it back when it starts to put on its umbrella-like blooms, or it won’t produce as well.  Also, watch out for caterpillars.  They can strip a dill plant in a few hours.  At the end of the season, let your dill go to seed and dry out, then cut it down and throw the whole plant back in your garden.  It will reseed itself the next season!

IMG_9058

I grow cilantro specifically because I like to use it in my homemade salsa.  Fresh cilantro is also great on taco salads.  Here’s the thing, I have trouble keeping it from going to seed.  It always goes to seed about mid-season, and, unlike other herbs, it becomes unusable and unsalvageable.  If anyone has a tip to keep it going all season, clue me in!

IMG_9053

Fennel is very similar in appearance to dill, but does not taste or behave the same.  It grows to be huge – about 4 ft high!  I have honestly never used fennel in recipes.  I plant it in my butterfly garden (a garden with plants that butterflies and caterpillars are drawn to) because caterpillars – the same ones that eat my dill – love it.  In fact, I often remove the little offender from my dill and transfer it to my fennel.

IMG_9063

Fennel

IMG_9066

Bronze Fennel

Butterfly

These little boogers turn into beautiful Swallowtail Butterflies


 Parsley is a unique herb in that it is a biennial herb – it comes back the second year.  Its mild flavor makes it great in salads, red sauce, chicken, etc.  It is easy to grow, but it, too, is susceptible to caterpillars.

IMG_9056

Nasturtium is also unique.  It is an edible flower!  Both the flower and its leaves have a peppery taste and are amazing in salads (it also makes salads really pretty!).  Nasturtium has very pretty flowers and grows easily and rapidly.  It is also very hardy.  Even if you’re not into eating flowers (it freaks my husband out a little), this is a great flower to plant in pots and have on your porch  because it requires so little attention.

IMG_9071


There are so many herbs, and the ways to use them are endless!  But if I had to choose just a few, I would pick oregano, basil, and rosemary – they’re my favorites, and the ones I use the most.  Find your favorites, and start your herb garden.  Now is the perfect time!

Leave a comment »

Herb Gardening Part 1 – Perennial Herbs

Herbs are one of the easiest things to grow.  They tolerate drought, most of them prefer full sun, and they even thrive in the heat.  And, since a lot of herbs are perennial, it is a one-time investment that yields years of harvest!

If you’re thinking of planting an herb garden, here are some things to consider.  First, start with things you know you’ll use and are comfortable using.  For example, I love using oregano and basil in cooking.  It adds great flavor to almost any dish, and nothing beats using it fresh (although I dry herbs to use in the winter, too).  Some herbs sound exotic, like Pineapple Sage and Chocolate Mint, but will you use them, or would you be giving up garden space for something that, although it smells good, may not be very practical for you?

Second, think about the space you have.  If you don’t have a lot of garden space to work with, pick herbs that don’t take up a lot of room.  Rosemary, thyme, chives, and tarragon are some of these.  If you have more room, add oregano and sage, both of which grow to take up several square feet.  If you don’t have a garden, don’t worry, herbs do great in container gardening, too!

Here are a few perennial herbs to consider:

 Oregano is a hearty herb that requires little maintenance.  And it tastes amazing in red sauce and pizza crust!  Oregano can grow to be pretty big – mine takes up a space of about two feet in diameter.

IMG_8968

 Sage is another hearty herb that grows in a more bush-like form.  It’s great with chicken and pork, and the purple flowers it puts on bring color to your garden.  Sage is another garden hog – mine is about 18 inches in diameter.

IMG_8980

Chives are amazing in salads and as toppings on baked potatoes.  A word of caution – they really multiply!  But, they’re pretty easy to dig up and thin out.

IMG_8977

Tarragon is another perennial herb, but it is not quite as hearty as others, in my experience.  It is less heat tolerant, and requires a little more water.  It’s wispy branches grow more up than out, so it doesn’t take up a lot of room.   It tastes wonderful in chicken and in cream sauces!

IMG_8973

Thyme is another great perennial addition to your garden.  It tastes wonderful in eggs and chicken, and it’s a great, low maintenance ground cover for any garden!

IMG_8970

Mint – I love mint, but here’s the thing: it would survive a nuclear blast.  Don’t be deceived in thinking it won’t take over.  It will.  I had mint in my garden, then is started to multiply, so I moved it to it’s own five foot section of garden.  In the last 4 years, it has completely filled that spot and crept into the yard (it sends out roots underground and comes up pretty much wherever it wants).  And the place I moved it from still has mint coming up at random places.  But, I love how it smells (so does my husband when he mows the part of our yard that is mint-infested).  I often add mint to bouquets of flowers for added scent, and adding mint to a pitcher of water or brewing it in tea is wonderful!  Bottom line, if you want to grow mint, plant it in a container!

IMG_9036

Lavender is another perennial with a great scent!  Depending on the kind you get, it can get pretty big, but it’s easy to trim back.  It also puts on either white or purple blooms, depending on the type.  Lavender is also great in flower bouquets.  I know you can cook with it, too, but I’ve never done so.

IMG_9039

Catnip is a part of the mint family, but isn’t quite as prolific.  I’m sure there are other ways to use it, but I just grow it to make my cats crazy.

IMG_9040

Rosemary is technically a perennial, however, if your winters get too cold, it won’t come back the next year.   Burpee says rosemary is a perennial in zones 7-10, and since I live in zone 6, I have occasionally had rosemary come back in the Spring, but it’s not a guarantee. Rosemary is amazing when baked in breads and sauces!

Perennial herbs are a great addition to any garden, and their heartiness and beauty can be a great, functional addition to landscaping.  Start small, and slowly add to your garden; and don’t forget to save room for the annual herbs!  Happy gardening!

Leave a comment »

Winner, Winner, (Crock Pot) Chicken Dinner

I’m always looking for ways to help my family eat healthier.  With all the scary information about preservatives, GMOs, hormones, etc. floating around,  I figure one of the best ways to avoid some of the scariness is to make most things from scratch – plus, it usually tastes better.

There is one problem with this, though – I really don’t enjoy cooking.

Don’t get me wrong, I cook almost all of our dinners.  We rarely eat out, and I’m not big on frozen dinners, so I really don’t have another choice.  But, it’s not my passion.  Maybe it’s because it usually takes longer to make it than to eat it.  Maybe I just don’t like being in the kitchen that long.  Or, maybe I just hate reading directions.  Whatever it is, I gravitate more toward quick meals or things I can throw in the crock pot and not worry about until it’s time to eat.

Thus, Crock Pot Chicken is one of my favorites.  We seriously have it about once a month.  It’s so easy and inexpensive and non-wasteful.  You can usually find two whole chickens at Costco or Sam’s for around $12, and we always have leftovers from the meal, which I can use to make chicken salad or soup later that week or freeze to use later.  And, I make my own chicken broth from the bones and juices, which tastes so much better than canned, I can’t even explain it.


Crock Pot Chicken

Ingredients:

1 Whole, thawed chicken with innards removed

1 Tbs Garlic Powder

1 Tbs Oregano

1 Tbs Basil

1 Tbs Sage

1 tsp Salt

2 Tbs Butter

1 C Water

Mix herbs and seasonings together in a bowl.

With a knife, loosen, but don’t remove, the skin on the breast and legs of the chicken.  Then, put butter under the skin.  Next, put the herbs under the skin.

Place the whole chicken in the crock pot with the cup of water, and cook on low all day.

IMG_8657

It’s that easy!!


Homemade Chicken Broth

After you’ve taken the leftover chicken out of the crock pot (I shred mine and freeze or refrigerate to use in recipes later), put some of the larger bones and meatier pieces back in the crock pot.  Add whatever herbs and seasonings you like – sage, basil, oregano, garlic powder, etc.  Add a few vegetables, such as carrots, celery or onion – really whatever you happen to have on-hand is probably fine.  Finally, add water.  How much water you add depends on how strong you like your broth.  I usually add 8 cups to whatever juices are already there.  Cook your broth on low all night.

IMG_8660     IMG_8664

In the morning, turn off your crock pot and let the broth cool.  When it’s cool enough, strain out the veggies and bones,

IMG_8665

then, put the broth into freezer bags (I do this in one-cup measurements), and put it in the freezer!

IMG_8666

If you don’t have time to mess with the broth in the morning, just put the whole crock pot in the fridge (after it’s cooled a bit) until you do!

I usually get about 10 cups of broth from doing this.  And the broth is so good in chicken noodle soup, tomato soup – really whatever calls for chicken broth or stock.

You just got at least one meal (but probably more than that) and 10 cups of broth out of a $6 chicken!


1 Comment »

Welcome to The Crazy Hat Box Blog!

Welcome to our blog site! The Crazy Hat Box is a site about the many crazy hats we wear! You’ll see blogs about throwing parties (The Party Hat), gardening (The Sun Hat), cooking (The Chef’s Hat), DIY projects (The Hard Hat), and a lot more! We’re so excited to start this new journey!

To see a listing of our hats, go to the Our Hats page.

Thanks for joining us!

IMG_8705_2


Leave a comment »