The Crazy Hat Box

there's a hat for that!

How Not to Treat a Knee Injury (A “Put Your Glasses on First” Installment)

So, about 3 years ago my husband hurt his knee. Many years ago I had taken a couple of massage classes so I worked on his knee. He said it felt better, but it was still hurting. He has a high threshold for pain so I knew that him saying that meant it hurt bad and he probably wouldn’t sleep. So I had him take some over-the-counter pain meds and started looking for the heating pad. I found it and we tried it. But because the injury was on the side of his knee, it was difficult to get the heating pad to stay put. In comes my brilliant idea! By brilliant, I mean, well, you’ll see.  I remembered that we had some hand warmers in the bathroom cabinet. I go grab one, and an ACE bandage wrap. I open it up to activate it, hold it on his knee and wrap it up with the bandage. Feeling pretty proud of my brilliance, I got ready for bed while he settled in. A few minutes later, he wakes up and says, “something’s not right”. I go over, take the bandage off, and remove the hand warmer. His skin was bright red and there were blisters forming. Needless to say, I felt terrible! So he ended up having an injured knee and needing burn cream for the skin. I definitely deserved The Dunce Cap on that one.  So, by brilliant, I mean not brilliant.

Knee Injury

On a side note, my husband said I should have titled this “HAND Warmers, or Put Your Glasses on First”.  He always has to be funny.

Leave a comment »

What is Your Address?

What is your address? What is your phone number? These seem like easy enough questions right? Can your child answer them? I have been surprised when I am out with other moms how many are impressed that my daughter (who turned 3 this summer)knows her address and my cell phone number. Many have told me they never thought to teach their child this important information. This information along with your full name (mommy isn’t going to help you much)is VERY important if you and your child would ever become separated. Your child knowing this information could drastically cut down on the time that you are apart. They could tell whoever is helping them your contact information and you could be notified right away where they were.

Stay Safe!

Leave a comment »

Custom Blinds

I hate mini-blinds.  Not the way they look necessarily.  Trying to keep them clean.  We don’t buy the expensive kind, so maybe those are easier to clean.  I don’t know.  But the inexpensive kind are NOT easy to clean.  My mom had a great idea.  Why not buy the pull down kind and cover them with fabric ourselves?  Why not, I said.  So, we picked a day, did a little shopping, and did it.

What you need

Pull down blind.

Material.  I bought 4 yards, which was just enough for 2 blinds with none left over.  But, our house has huge windows.

Measuring tape.

Pen or pencil.

Spray adhesive.  I used this.  I liked it a lot because it gives you time to reposition even after it’s sprayed.  It also sprays on white, but dries clear.  Since we were using a white blind, that didn’t really matter, but it could come in handy for other projects.

An outdoor table that you can get the adhesive on.

An iron and a table big enough to iron the material on.

A sharp pair of scissors.

A second person (I HIGHLY recommend this).

Custom shades 5 Custom Shades 1

Instructions

Measure your window.  Then roll out the blind and mark how far up you need the material to go.

Custom shades 3 Custom Shades 2

Next, will want to measure your material and cut it to size.  Then, iron it.

Custom shades 8

Next take your material, blind, and spray adhesive outside.

Roll out the blind and lay it on a large, clean, dry surface.

Custom shades 6

Next, spray on a generous amount of the adhesive.  We started from the top and laid the material down, pressing down and pushing out any wrinkles.  This took a while and we had to reposition it several times.  We also had to re-spray some of the edges.

Once we were done with the first one, we took a break and let that dry for a while.

Custom shades 7

Then, we did the second one the exact same way.

We took them both inside and hung them up by following the instructions that came with the blinds.

Custom shades 9

Here is the finished product.  This is not complicated, but it is time consuming.  Plan on it taking a while and recruit help!  It was worth it though.


1 Comment »

Hold the Oil, Please!

I’m messy.  Or, maybe just clumsy.  Either way, I am constantly staining my clothes.  I can’t tell you how many articles of clothing have been relegated to workout or yard work clothes.  Bleach, paint, dirt, and oil have all been the culprit in retiring clothes.

A few years ago, a friend told me a cleaning secret that changed my life… or at least one that made me throw out clothes less often.  She told me how to get oil stains out of clothing.  The secret?  WD-40.  I’ll be honest, I didn’t believe her at first.  I was even afraid to try it.  But, after a while, I figured that the clothing was ruined anyway – why not try it?  You know what?  IT WORKED!

Take this shirt – one of my favorites – that I somehow stained with oil.  I don’t even know how.

image001

Put an old towel in-between the layers of clothing (or, just use your hand like I did), and spray WD-40 on the stain.  This part takes guts.

image001

image002

image003

Next, cover the WD-40 with laundry detergent, and work it into the area.

image004

Then, throw it in the wash.  No need to wash it separately or in any special way.  And, when it comes out of the wash… tada!  My shirt is now oil free!

IMG_8612

I’ve done this so many times, but every time, I still get nervous.  Something about spraying WD-40 on clothing seems counter-intuitive.  And every time, it works.  It’s probably the only magic trick I know.

Leave a comment »

Safety Saturdays

Welcome to our first Safety Saturday post! Safety Saturday posts are here to help you and your family keep all kinds of safety in mind. We will be sharing tips on how to prepare you for emergencies and general  safety tips.  If you have safety topic that you would like The Crazy Hat Box to research for you, please comment below.


Power Outages

We recently had a 12 hour power outage at our house! During that time I came to realize that with two little ones in the house now, I need to be even more prepared.  Since the power outage, I have started researching to make sure that our house is ready for the next time. I really hope that the next time isn’t for a long time! In my searching I found that the American Red Cross has a wonderful website full of tips to help you get your family prepared.  One of the first steps to having your family prepared is to have an emergency kit. Watch for a post on this in the future. Today we will just touch on things that will help you with a power outage. Here is a list of what I have gotten ready for our family for the next time that we are without power.

1.  Flashlights with working batteries. Check these often and try to have them in every room. Make sure that everyone knows where they are and how they work. We also have a few little flashlights that have magnets on the side of our fridge. Candles are not recommended due to the fire risk. This is especially important if you have small children or pets.

2.  Extra batteries! Having extra batteries in all sizes that go with your flashlights and other emergency supplies

3.  Food that is non-perishable and that can be eaten/ prepared without power.

4.  A battery powered weather radio. We have a NOAA weather radio that plugs in but has a battery back up. This is extremely important if the power outage is caused from severe weather. You need to stay informed if the weather is getting worse or if new warnings are issued in your area. If you don’t have power you can’t watch your favorite weather man. You also can’t count on hearing the tornado sirens. Tornado sirens are designed to give notice to people who are outside! I hear people all the time say that they didn’t hear the sirens in their house. Repeat after me “Tornado sirens are for outside warning, weather radios are for inside warning!”

Here are some supplies that you need if you have small children in your home.

5.  Disposable diapers. Now this might seem like a no brainier but I did not have any of these in our house when we had our power outage. We use cloth diapers so I didn’t think that I needed any disposables but as the hours ticked by without the power coming back on I realized this was a mistake. I saw my stash of clean diapers getting smaller and smaller. Having no idea when I could wash them really added to the stress of the situation.

6. Activities to keep the kids busy. This is more for your sanity! Board games, cards, and coloring books are a great way to have some family fun.

7. Feeding supplies for babies. If you are a formula feeding mom do you have a way to prepare the formula without power? Are you a pumping mom? Do you have a battery pack adaptor for your pump? Or maybe a manual pump as a back up? This is one time it was really handy to be a breastfeeding mom. I didn’t have to worry about warming up a bottle.

8. Cash! If your whole area is with out power you will not be able to pay with a credit card.

9.  Know how to open your garage door without power so that you can get your car out.

10. Does your family have any special needs that you need to look at if you lost power? Medical issues? Pet issues?

11. Keep your cell phone charged! You will feel a lot less panicked if your cell phone will work and you have more than 5% battery life.

12. Keep your fridge and freezer closed as much as possible to help keep the temperature at a level to keep your food safe.

13. If you use a generator make sure that you know how to safely use it! Never set the generator up in your house or garage!
After you have managed to stay sane though the power outage and your power has come back on you will need to start checking your food to make sure that it has stayed safe to eat. If your power outage was less than 4 hours you shouldn’t have to much to worry about. A fridge that has been unopened should keep food at a safe temp for 4 hours.  A freezer that is full will keep food at a frozen temperature for about 48 hours, 24 hours if it is half full, but you have to keep the door closed. We moved our milk and cheeses to our freezer to help them keep the temp longer when we had our power outage. Here are the tips from the America Red Cross on how to check your food and know if it is safe. (http://www.redcross.org/prepare/disaster/power-outage)

  • Throw away any food that has been exposed to temperatures higher than 40° F (4° C) for 2 hours or more, or that has an unusual odor, color or texture. When in doubt, throw it out!
  • Never taste food or rely on appearance or odor to determine its safety. Some foods may look and smell fine, but if they have been at room temperature too long, bacteria causing food-borne illnesses can start growing quickly. Some types of bacteria produce toxins that cannot be destroyed by cooking.
  • If food in the freezer is colder than 40° F and has ice crystals on it, you can refreeze it.
  • If you are not sure food is cold enough, take its temperature with a food thermometer. Throw out any foods (meat, poultry, fish, eggs and leftovers) that have been exposed to temperatures higher than 40° F (4° C) for 2 hours or more, and any food that has an unusual odor, color or texture, or feels warm to touch.

If you have to throw out your food, you should check with your insurance company. Some homeowner policies have a refrigerator rider and will pay you some dollar amount to help cover the cost of your loss.

Being a breastfeeding, working mom I was really worried about my stash of breast milk. I was glad to know that the freezer would keep things frozen so long! I still wanted to make sure that my milk was safe for my little one so I went over and visited Kellymom.com. This a a wonderful website recommended to me by my lactation consultant. Here are the tips from Kellymom.com: http://kellymom.com/bf/pumpingmoms/milkstorage/frozen-milk-power-outage/

Some ways to keep your milk frozen:

  • If you have access to a generator, use it to operate your freezer during a power outage.
  • If a neighbor or a nearby store has power, ask if you can store your milk in their freezer until power is restored. Make sure your milk has contact information on it!
  • In your freezer (with no power): Open the freezer as little as possible. Food will stay frozen longer if the freezer is full: if you know ahead of time that you may lose power, fill empty spaces in your freezer with containers of water so that there is extra ice instead of empty space. Keep your expressed milk in the middle of the freezer, away from freezer walls. According to the USDA, “a full freezer will hold the temperature for approximately 48 hours (24 hours if it is half full) if the door remains closed.”
  • In a cooler: Pack the cooler as full as possible, to slow thawing. Crumpled newspaper is a good insulator if there is extra air space in the cooler. Covering the cooler with blankets will also help to keep it cold.
  • Extra air space in your freezer or cooler can be filled with dry ice, Techni Ice, “blue ice,” containers of water or ice, or snow.
  • Are you in an area with snow on the ground? You may be able to store your milk in a snow bank, out of the sun, or use snow/ice to keep your milk cool in your freezer or cooler.

I was making plans to move my freezer stash just to be safe when our power came back on.I was so happy that all my milk was still frozen and safe.

As a result of our power outage we did have to throw away a lot of the food that was in our refrigerator. Better safe than sorry. I also learned that I needed to be more prepared with my little ones. If you need more of more information I recomend checking out the American Red Cross website: http://www.redcross.org/prepare/disaster/power-outage and for more information on stored breast milk safety check out KellyMom.com here: http://kellymom.com


Stay safe!
 

1 Comment »

Keeping Cut Up Apples From Browning (No lemon juice required)

I’ve tried this several times and I have been really happy with the results.  It’s really nice to be able to prepare a healthy fruit for lunches ahead of time.

You will need:

The amount of apples that you need for the week

A large bowl

Chewable Vitamin C tablets

A Ziploc bag

A spoon or something to smash the pills with

What you need

What you need

Instructions

Put a couple of the chewable vitamin C tablets in the Ziploc bag.  With the back of a spoon, smash them into a fine powder.

Crisp Apples 2 Crisp Apples 3

Fill the large bowl about halfway with cold tap water.  Poor in and stir the vitamin C powder.

Crisp Apples 4

Vitamin C Water


As you can see, the powder will not completely dissolve, that’s ok.  The water should have an orange tint to it.

Cut up the apples you will need for the week into whatever size you want.  Put them in the vitamin C filled, cold water.  Soak for approximately 10 minutes.

Crisp Apples6Crisp Apples 5

I also push them down in the water and hold them for a second or two to make sure they are completely covered.

You can strain them or set them on a paper towel to drain the excess water.

Crisp Apples 7

Just after the bath

Put them in whatever air tight container you want and store them in the fridge.  They should stay crisp for at least 7 days.

Ready for the fridge!

Ready for the fridge!

They do get very slightly brown, however, nothing like they normally would.  They stay very crisp.

24 hours/day 1

24 hours/day 1

Day 2

Day 2


Day 6

Day 6

I won’t bore you and keep posting.  You get the idea.  I will say that I’ve only done this with apples that are crisp.  I’ve never tried a softer apple such as a Red Delicious.  I like anything that you can prepare ahead, so this is one I use on a regular basis.

Leave a comment »

Dirty Cup Holders and Trashy-ness

I don’t know why, but the cup holders in my car get dirty fast.  They’re a pain in the you-know-what to clean too.  So, I came up with an easy solution.  Silicone cupcake holders.  Yep.  We found the 3″ size in the store, but we were pretty sure they would be too small.  So, we went on the hunt and this is what I ordered.

Cupholders2 Cupholders1

They fit nicely into my car and they are easy to just pull out and clean.  No more dirty cup holders.  On a side note, I picked those colors on purpose.  Go Chiefs!

Trash.  What to do with it in the car.  I tried several different trash cans that you buy for the car.  The collapsible one kept, well, collapsing.  I also tried the kind that hang from the back of your seat.  That’s fine if you are sitting in the back seat, but apparently they frown on you driving from the back.  It would also be fine if you had ‘go-go gadget’ arms.  I don’t though.  So, I saw this on one of those life-hack posts.  So I tried it.  I went to ‘The Dollar Tree’ and bought a cereal container.

Trash3

There was a problem though.  It kept tipping over.  So, I added some weight to the bottom.

Trash 1

Then I put in a plastic bag, put the lid on and it’s been very handy.  Now, they will ‘never catch me ridin’ dirty’.

Trash2

That’s enough about my trash.  Those are 2 little things I use in my car for a little more convenience.

Leave a comment »

Hosting Outside the Box

When I was first married and wanted to host something, it was almost always dinner. I mean, that’s what you do, right? You have people over for dinner. You get a date on the calendar for a Friday or Saturday night. You search the World Wide Web for a new, fun recipe. Once you find one that doesn’t have too many ingredients, or at least all ingredients that you’ve heard of, then you realize you’ve wasted 2 hours and move on. The day arrives and you scrunch in all of the last-minute cleaning that you procrastinated all week, light a great smelling candle in the powder room, put on some music and you are ready for your dinner guests. They get there, you take their coats, pour some drinks, maybe have a little conversation and then dinner is served. I have had many a fun night with this same scenario. I will always want to have people over for dinner. But, there are some fun options. I’m learning to host outside of the box. I’m sure none of these are original ideas from me. You may have tried every one of them. I’ve tried some, but I plan to try them all. Here goes…

Brunch

Our little town has a parade in May every year and it is a blast to host brunch on our sun porch and watch the parade.

Afternoon Tea

Little sandwiches and delicious desserts. So many fun things you can do with this.

Afternoon Tea 1 Afternoon Tea 2

Progressive Dinner

This was quite popular when I was younger. You have hors devours at one house (or I’ve been to one at restaurants), salad at another, dinner at another and dessert at the final house. You could add after dinner drinks if you wanted to.

1 House Progressive Dinner

You could have hors devours on the front porch, salad in the eat-in kitchen, main course in the dining room and dessert in the back yard or any combination of those. The fun thing about that would be that you could have a different ice breaker or trivia type game in each location. You could also choose to set each table with a different theme or the same theme with different colors. The possibilities are endless!

Dessert Under the Stars

Invite people over late in the evening. Set up a table with lots of candles. Put some blankets in a basket or wagon in case it gets chilly. Have a separate table with a bunch of different mini desserts, or set the table and put a little piece of several different things at each place setting. Try some new drink recipes and put some coffee in a thermos so it stays hot. Play music softly in the back ground. It doesn’t have to be fancy. Let creation be the main attraction.

Dessert 2 Dessert 1

Movie and Popcorn Night

Have a popcorn bar.  You can do so many things.  A couple of my favorites are popcorn with Hot Tamales for a cinnamon popcorn taste or popcorn with Milk Duds for a caramel popcorn taste.  If you do popcorn on a regular basis I highly recommend this (it has changed our popcorn popping and eating experience).  You could add movie trivia to the night for fun.  Have a prize for the winner.  It doesn’t have to be expensive.  You could give a box of Hot Tamales or Milk Duds and a gift card (physical or digital) from Red Box.  The cost for the gift card could be as little as $1.00.

Game Night

A classic that is always fun.

Pot Luck

Don’t be afraid to let people bring food too. Have your posse over and set a theme (or don’t) and you can have a blast. You might end up with all desserts, but life is short, live a little!

Think outside the box about who you invite sometimes. Don’t be limited by only people your age or people who may have kids the same age. Branch out. You will get to know some lovely people that way!

Leave a comment »

Reduce, Reuse, Build a Fort!

I scan through Pinterest several times a week, pinning the things I like into my carefully thought-out categories.  Then, I promptly forget what I pinned and go about my life.  At least, I thought I forgot.  But apparently my brain files some of those pins away to bring up just when I need them.

A few months ago, I decided to clean out my linen closet.  I was tired of dreading opening the closet because of what might fall out.  We had so many sets of sheets for our king-size bed, but I only really used two of the sets because the rest didn’t fit the bed right, or I didn’t like the feel of them (yes, I’m picky; I know).  As I sat among the several discarded sets, I wondered, what do you do with sheets you don’t want any more?  There was technically nothing wrong with the sheets, but do you donate them?  Throw them out?  Then, my brain brought up the pin I had pinned weeks earlier:

Create a Fort Kit from a set of sheets

Yes!  I have lots of nieces and nephews, and two boys of my own – this is perfect!  Then, I put the sheets in storage, so that I could create the fort kits when I had more time… and promptly forgot about them.

…Until my nephew’s birthday.  My brain again reminded me of the very cool gift idea I had and suggested that now would be a good time to make that fort kit.  So, I did.

First, I made a draw-string bag out of the pillowcase.  I turned the pillowcase inside-out, and cut a V into the two seamed edges.  Then, I folded the top edge over and sewed it down, leaving about 2 inches between the top edge and the new seam.

image004

Then, I took some rope that I had bought at a local hardware store and cut two, three-foot sections.  I threaded them both (one at a time) opposite ways through the channel created by my seam, pulling the excess rope through the notches I had cut – one rope on either side – and tied the ends of each rope together so they made two handles.

image003Then, I turned the pillowcase right-side out, and, presto! – a drawstring bag!

Then, I decorated the drawstring bag with fabric paint.

image002

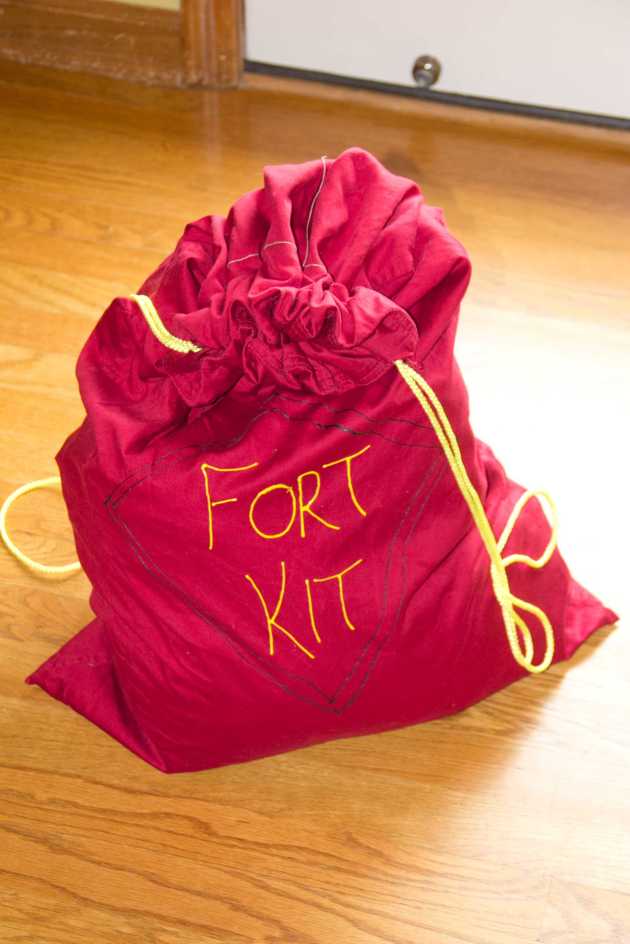
I filled the bag with the flat and fitted sheets.  Originally, I was going to cut the elastic out of the fitted sheet, but after making a fort for my kids with a fitted sheet, I realized that they actually work really well for fitting around couch arms and chair backs.  I added clamps, clothespins, and the rest of the rope to the bag for the ultimate Fort Kit!  My nephew loved it!

image005

image001


So, if you have sheet sets that you don’t use any more, give them another life!


For the original pin, click here.


Leave a comment »