The Crazy Hat Box

there's a hat for that!

Why I Have a Baseball Bat by My Side of the Bed

I’ll admit, I like to be scared.  I don’t like gore, but I love suspenseful movies.  I think it’s hilarious when someone jumps out and scares the ever-living daylights out of me.  I love it when someone tells me a scary story and it sends chills down my spine.  When I was a kid, my parents did it all the time.  My mom said that even when I was a toddler, if one of them scared me, I would say “do it again!”  I guess it’s my kind of ‘extreme sport’.  I get an adrenaline rush out of it.  I realize not everyone is like that.  This day, however, was different….

It was a beautiful Saturday morning in the fall.  I’m a morning person and I like fall best, so the crisp air and lovely breeze coming through the open window, woke me up bright and early.  First things first, I let the dog out.  She started wagging her tail and walking towards the door as soon as I sat up.  I stepped outside with her.  I wanted to soak in some of my favorite weather.  She lingered and so did I.  Finally we walked back in the house.  I walked into the kitchen and started some coffee.  Then, I walked to my basket of magazines, picked out a couple with fall inspiration, and went back to snuggle under the covers.  My husband hadn’t moved.  He is a night owl, so he goes to sleep much later than me, and then tries to sleep in a little longer.  I got back into bed as gingerly as possible.  He still didn’t move, so I was proud of myself.   I’m happily flipping through my magazine, getting inspired for the fall season. “Wait, what was that?”  I thought.  “I could swear that sounded like someone was walking on our creaky wooden floors.”  I looked down and the dog had her ears on high alert, but she wasn’t moving or growling.  I sat there perfectly still and didn’t hear anything.  She laid her head back down and I went back to reading.  There it was again.  This time the dog stood up.  For a moment, I was frozen.  Then I could see the shadow of someone walking toward the bedroom!  I whispered to my husband.  “Honey, someone’s in the house.”  Again, this time a little louder, “Honey, honey, someone’s in the house!”  By this time, the dog has her head down, the hair on her neck standing straight up, and her teeth bared.  I thought to myself, “ok.  the dog will give him a run for his money for at least a few seconds.”  While at the same time, looking around, desperately, for something to hit this guy over the head with.  Keep in mind, this was all in a matter of seconds.  Finally, I thought, I’m going to have to stop whispering, and shove him out of the bed.  I said, in a much louder voice, “HONEY, SOMEONE IS IN OUR HOUSE!”.  Just as I was saying ‘HOUSE’, I reached over to shake him awake.  It was pillows.  He came strolling in with a big grin on his face.  The dog started doing her ‘I’m so happy to see you’ dance.  I started laughing and punching him at the same time.  So, this day wasn’t really different.  I thought “good one” to myself.  I told him it was going to be really hard to top himself after that.  He did though.  That’s another story.  Oh, and now there’s a baseball bat sitting by my side of the bed.

Leave a comment »

Apple Dump Cake

Fall in the Midwest is about all things apple.  I love apples!  This recipe is so easy.   This one is for individual sized dump cakes.  In my opinion it’s not nearly as good heated up later, so, I usually make single serving/s.  It’s easy to make a 3 or 4 person serving or a big one.  I will include instructions for each.  On a side note here is a great website for all kinds of great information on apples.

Ingredients:

Dump Cake 1

1 medium to large apple of your choice (I love Honeycrisp or Gala apples, but any will do)

1/2 cup of cinnamon chips (you get these in the same place as you get chocolate chips at the store).  You can add more or less to taste.

Yellow cake mix (I use Jiffy Cake Mix for the smaller, 3 to 4 person size.  I use a regular size cake mix for the big one)

1/4 to 1/2 stick of butter

Vanilla Ice Cream (optional) (I say optional, but it’s really so much better with the ice cream)

Instructions:

Preheat your oven to 350 degrees.

Cut up your apple/s into bite sized chunks and put in the bottom of your muffin tin.

Dump Cake 2

Put a few cinnamon chips in with the apples.

Dump Cake 3

Cover the top with the dry yellow cake mix and pat down.  You can save the extra cake mix in a Ziploc baggie.

Dump Cake 4

Slice the butter into thin slices and place on top of the cake mix until the entire top is covered.

Dump Cake 5

Bake in the preheated oven for about 50 minutes.  If you bake this in a regular cake pan I recommend a full hour in the oven.

Dump Cake 6

It will be bubbly and golden brown on top.  Wait a few minutes to serve because it’s ‘melt-your-face-off’ hot at this point.  Don’t wait too long though, because you want it to be warm.  Put a scoop or 2 of ice cream on top and you are ready.

Dump Cake 7

Variations

For the 3 to 4 person variety just use 2 to 3 large apples, 3/4 to 1 cup of cinnamon chips, a Jiffey Cake Mix and 1/2 to 3/4 stick of butter.

For the regular sized cake mix, use 4 to 5 large apples and 1 to 1 1/2 cups cinnamon chips.

Baking time and temp is the same.

Make Ahead Instructions

This would look great to make ahead in individual servings in little canning jars.  But wait, you say, the apples will turn brown.  Never fear.  I have instructions for how to keep apples from browning when you cut them up ahead of time.  Here they are.

Leave a comment »

Paper Pumpkins

This project is super easy.  If you already have the supplies, it only takes a few minutes to make.  I’ve used them for place settings on a Thanksgiving table before.

Paper Pumpkins 5

For the larger pumpkin, I cut the paper into strips measuring 1 1/2 inches wide.  I used 12″ x 12″ scrapbook paper.

Paper Pumpkins 3

I then punched a small hole into the bottom and top of the strips of paper.

Paper Pumpkins 2

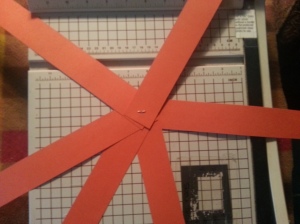
I used 6 strips, but you could use more if you like.  I put the brad in the bottom hole of each strip and closed it.  Then, I spread out the strips to where they sort of look like a spider.

Paper Pumkins 1

I then put the brad in one strip at a time and then closed it.  You have to play with these a little to get them to sit flat.  I folded the bottom part a little so it would sit.  Then, I wrapped the pipe cleaner around a pen to make it curly.  Once that was done, I wrapped it around the brad to make the vine part of the pumpkin.

Paper Pumpkins 4

To make these for Halloween, it would be easy to put googly eyes on them, or even a spider brad would be fun.  Of course you wouldn’t want to use a candle in them, but a battery candle would work nicely.

For the smaller one I cut the strips 1″ wide.  I decided to try it with 2 different colors and I think it looks kinda cute.  This would be super easy to do with kids.  You can add glitter or stickers or stamps.  Easy and quick!

Paper Pumkin Littles 2 Paper Pumkin Littles 1

Leave a comment »

Spiderweb Door Decoration

I have two boys, and in true boy fashion, they love dirt, making messes, bugs, and spiders.  So, to help celebrate the season, we did a spider and spiderweb craft.  I’ve seen a lot of examples for making various bugs and animals out of egg cartons, but, let’s face it, the spider’s web is just as cool as the spider itself.  Why not make a web for our egg carton spiders and hang it on the door?  It ended up being so cute, and a perfect way to spend a sick day away from school.

What you’ll need:

  • An egg carton
  • Paint, markers, or crayons
  • Googly eyes
  • Glue
  • Pipe cleaners
  • String
  • Popsicle sticks

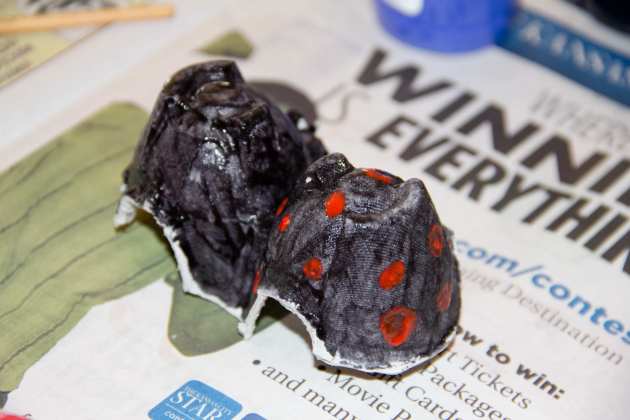
I cut the egg carton into sections of two egg cups each.  I was just going to cut it into one egg-cup sections, but my six-year-old informed me that spiders have a head AND and abdomen.  Then, we painted our spider bodies.

IMG_8944

IMG_8942

While our spider bodies dried, I made the web (my kids are a little too young to be able to do this part).  I glued popsicle sticks together in a sort of circle.

IMG_8948

Then, I wrapped string around it (as much to help it stay together as for aesthetic reasons).  I cut a smaller portion of string and made it into a circle to use in the center of the web, then wrapped string around the outside popsicle circle and through the inside string circle.  Finally, I wove string through it all to make the web!  Don’t forget to add a loop at the top so you can hang up the web!

IMG_8949

When our spider bodies were dry, we glued googly eyes to them and added pipe cleaner legs – two pipe cleaners cut into four pieces for a total of eight legs each.

IMG_8955

IMG_8952

Isn’t this the cutest door decoration?  The pipe cleaner legs hooked perfectly around the web, keeping the spiders in place!

IMG_8961

IMG_8957


Happy Halloween!!

Leave a comment »

Easy Slow Cooker Hot Apple Cider

This is the cheaters way to make cider.  I would love to say I juiced apples and made if from scratch, but I didn’t.  I think this recipe is pretty delicious on a cool fall day though.

Cider 3

What you’ll need:

Your choice of apple cider.

1 apple (any kind will do)

Cinnamon.  I highly recommend cinnamon sticks, but I didn’t have any on hand so I used ground cinnamon.

A pinch of nutmeg.

A pinch of ground cloves.

Directions:

Pour apple cider into your slow cooker.

Cut up the apple and dump in.  I use the core too, but I take the seeds out so no one chokes on one.

Cider 1

Sprinkle ground cinnamon to taste.  I use a generous helping because I love cinnamon.

A shake or two of the nutmeg and cloves (a little goes a long way with these 2 spices).

Cider 4

Turn the slow cooker on high if you only have a couple of hours before serving or low if you have longer.  Stir occasionally.

It would be delicious with some orange zest in it.  It makes the house smell great too!

Good to the last drop!

Good to the last drop!


Leave a comment »

Not Your Ordinary Shelving Unit

Recently, I bought a used shelving unit with the purpose of using it as a sort of office space in the basement.  Our space is limited, and this fit the bill for taking up little floor space while holding my office supplies.  And the adjustable shelves made it even more useful.

The shelf unit was in okay shape, but was just kind of blah.  It was just black with some nicks and scratches from use.

20140714_105817

I had some paint left over from other projects, so I decided a shelf remodel was in order!  First, I put newspaper over the back and spray-painted the inside panels aqua.

20140714_111838

Then, I painted the outside panels with chalkboard paint so I could use that space to write reminders or inspirational sayings.

20140717_113025

Finally, I painted the inside backing a wine red.  When it was dry, I moved it into the basement and filled it with all my office supplies!  I love the way this turned and ordinary shelving unit into a custom work.  It’s so much more fun to look at!

20140717_113308

Leave a comment »