The Crazy Hat Box

there's a hat for that!

Planning a Monthly Dinner Menu

recipelist

Do you ever stand in your kitchen at 5:30pm and know that you need to make dinner, but you have absolutely no idea what to make?  It’s not that you don’t have plenty of food, but without a recipe, it’s all just a bunch of purposeless ingredients.  I do this more than I care to admit.  Enter the monthly menu plan!

A few years ago, in efforts to reduce the amount we spent on groceries, and to decrease the number of times I stood in my kitchen for 15 minutes trying to think of what to have before just making grilled cheese, I started grocery shopping once a month, which forced me to plan a dinner menu for the month.  That way, on my one trip to the grocery store a month, I was able to buy all the ingredients for all the meals I planned to make.

I’ve perfected monthly meal planning to how it works best for my family, so I thought I’d share a few pointers.

1. You Don’t Have to Plan 30 Meals

Monthly menu planning can seem really overwhelming when you think you have to plan and shop for 30 meals.  But in reality, we rarely eat at home every day of the week.  Think about your week.  Are there days you don’t eat at home?  We eat at my parents’ house once a week, and at my in-laws’ once a week.  There are two meals I don’t have to plan. Maybe you have family dinners or you know you eat out so many times over the month.  Subtract those times.

Then, take into consideration that some meals are going to be things you can quickly put together – meals you know you always have ingredients for.  I know that at least once a week I’m not going to want to make a meal I have to read a recipe for.  These are your go-to meals for busy/lazy days.  For us, it’s Chicken Noodle Soup or Pizza or Breakfast Food.

Finally, allow for left-overs.  If you make big batch of soup on Monday and know you’ll have leftovers, plan to have it again on a day you won’t feel like cooking.  You can even mix it up so it doesn’t feel like the same meal.  Add another ingredient before warming it up, or serve different sides with it.

Tip: Write your recipes on a white board or chalk board, along with where to find the recipe (Pinterest or recipe book with page number) so you can easily see your options for meals to make.

2. Don’t be Overzealous

When I pick recipes, I peruse Pinterest or recipe books I have (one of my favorites is Betty Crocker’s Quick and Easy Cookbook), but I don’t pick anything that has more than about 7 ingredients.  While I would like to think I can cook like a gourmet chef, in reality, I’m not going to want to test that theory on a Tuesday night.  Pick things you’re comfortable making, things you’re familiar with.  If you want to try new meals to expand your cooking expertise, pick one recipe that’s more challenging.  And remember, you have to shop for these ingredients – don’t pick recipes that you’ll have to run all over the city to find ingredients for.

Tip: When picking Pinterest Recipes, create a board just for that month’s recipes.  That way, they’re easier to find and you won’t have to scroll through every recipe you’ve ever pinned.  Just remember to move recipes to you other recipe board at the end of the month, before adding new recipes for the next month!

3.  Pick Recipes That Compliment Each Other

When you’re looking through recipes, think about how you can use the same ingredients for other meals.  For example, if I’m planning on making a chicken in the crockpot, I plan on another meal that also uses chicken because we’re not going to eat a whole chicken in one meal.  I might choose to make Chicken Noodle Soup or Chicken Enchiladas later that week.  This will decrease the waste of ingredients not used up and will also help you save money on your grocery bill.

Tip: Pay attention to cook or prep times.  I can’t tell you how many times I’ve chosen a recipe and stood in my kitchen ready to cook only to realize I should have marinated something overnight or that I have to let dough rise 15 times over 3 hours. 

4.  Don’t Forget the Sides

I very rarely plan to have specific sides with my main courses, but I always try to have a good selection of vegetables, fruits, rice, pastas, etc., I know my family will eat. Then, I just make a couple of those to have a well-rounded meal.


I usually plan for about 12-15 dinners a month.  Then, I get all the ingredients in one shopping trip.  That way, I have a go-to list of recipes to make, and I already have everything it takes to make them.  Please note, I don’t plan a menu for breakfasts or lunches, mainly because my family eats the same basic things for those meals, so they don’t require much planning.

Still having trouble coming up with meal ideas?  Visit our Pinterest Board The Chef’s Hat – Monthly Meal Planning Ideas.

Leave a comment »

January Blues

I hate January.  Christmas and New Year’s is over, and so are the parties and family events.  I no longer give myself excuses to eat unhealthy (but so delicious) foods, and we’re back on a budget.  January is blah.  It’s dreary.  It’s long.  It’s cold.  And with the exception of my beautiful sister’s birthday (and it’s the last day of the month so, really, it could be counted as a February event), there is nothing to look forward to.

With that in mind, and the knowledge that I am subject to getting the January blues, I decided to start a thankfulness journal.  Every day, I write one thing I’m thankful for that day.  It can be big stuff or little stuff, but it must be specific to me – not something vague like “life” or “the air I breathe”.  My intention is to do this every January, so I’m leaving room under each day’s thankfulness log for next year’s log.  Then, I can look back on what I was thankful for exactly one year (or hopefully more) ago.

Yesterday, I was thankful for one last day of winter break.  A chance to be with my family before everyone went back to school and work.  One more day of not running a taxi service.

Today, I’m thankful for my new Converse shoes.  Shallow, right?  But I am. They made school drop-off, grocery shopping, laundry, and getting back into the daily grind a little more tolerable.

What about you?  How do you combat January’s blahness? grateful

Leave a comment »

(Baseball) Diamonds are a Girl’s Best Friend

You can’t live in the Midwest right now and not have baseball fever.  In fact, if you go out in public and you’re not wearing blue, chances are, you’re the odd one out.  It’s everywhere, and Midwest pride has never been higher!

When my sister and her boyfriend got engaged during last year’s post season, we knew we’d be throwing them a baseball-themed couples’ shower!  So we went to work gathering all kinds of ideas for decorations, foods, and gifts.  We threw a couples’ shower because, c’mon, the guys have to have fun, too, and the baseball theme was a big hit!  So, if you’re looking for ideas for a World Series party, look no further!

The Decorations

What’s a Baseball party without the baseballs?

image001

White paper lanterns with stitching drawn in red Sharpie

image003

image010

image019

Rubber bases used as placemats

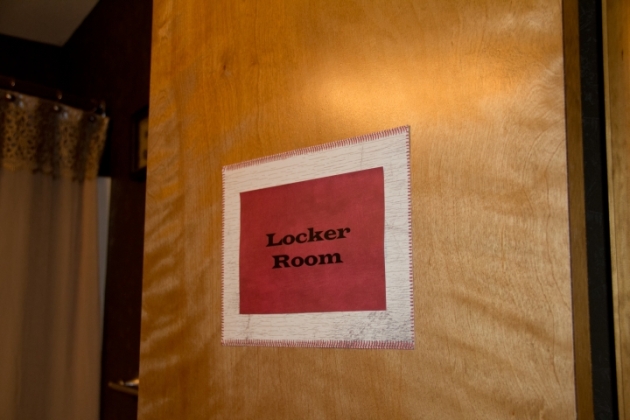
We also created baseball-themed signs to place around the house:

image007

“Locker Room” sign for the bathroom

image006

“What a Catch” sign for the front door

image005

“Gift Shop” sign for the gift table

The Food

The thing about baseball food is it’s easy and universally liked.  Who doesn’t love hotdogs, popcorn, and cotton candy?

image015 image017 image016 image013

image014 image011 image008image009

image012


The Extras

As a gift for the Bride and Groom, we found a wooden C (the first letter of their last name), added baseball stitching to it (with red Sharpie), and had people sign it.  And we had baseball caps with “Bride” and “Groom” written on them for the couple to wear at the shower!

image004

image002

image018

The Games

What’s a party without games?  We did a quiz about the couple, and also a quiz about Baseball Terminology.  Which is a baseball term: Uncle Charlie or Uncle Bob? If you’re curious about the answers, here they are: Baseball Terminology – answers

Get out there and party for our Boys in Blue – Let’s Go Royals!

Leave a comment »

Reduce and Reuse – but Recycle the Pickle Jar

I’m a big fan of repurposing things.  I’ve turned old glass bottles into soap dispensers, tiles into coasters, and old windows into a greenhouse box.  But, my favorite repurposing technique is reusing containers and jars, often originally containing food, to store other things.  However, it doesn’t always work out.

I especially hate throwing out glass jars.  It seems such a waste, when they could be used for other things.  After I use the contents of a jar, I wash it well and use it for something else.  One day, after finishing a jar of dill pickles, I washed it and put it aside to use later.  Not long afterwards, I picked up a big bag of dark chocolate Peanut M&Ms (yum!) at the grocery store.  I brought them home and looked for something to keep my snack in.  Remembering the pickle jar, I emptied the bag into it and put it high on a shelf (so no one stole my snack).

The next day, I went to get a few M&Ms.  I opened the jar to a whiff of pickles.  Hmmm.  I tasted one.  Yep, M&Ms infused with pickles.  Not exactly what I was going for.  And the longer the M&Ms were in the jar, the more they tasted like pickles.  I still ate them because, c’mon, it’s still chocolate.  And, on the bright side, no one wanted my snack.

So, lesson learned – put the pickle jar in the recycling bin!

Here are some other items I’ve repurposed (without the new contents smelling like the old contents):

IMG_1066

A salsa jar repurposed as a container for yeast.

IMG_1070

A jar previously containing a candle now used for miscellaneous office supplies.

IMG_1068

A food can  as a fork holder (this works great for parties).

Happy repurposing!


Leave a comment »

Chalk It Up to Repurposing

Let’s talk picture frames.  Who doesn’t have a ton of them stashed away somewhere, and who hasn’t given a ton to charity (or the trash man).  You know what I’m talking about.  Frames that are outdated or nicked or scratched.  Frames that you swear you’re going to use again… somewhere.  Well, why not give those frames a new look – and a new purpose as a chalk board!

Step 1:  Choose your frame

It really doesn’t matter what type of frame you have or what size.  It can be metal or wood; thin-framed or thick.  Just whatever strikes your fancy.  If you’re a clutter-free freak and don’t happen to have spare frames (is there such a person?), don’t worry, you can pick frames up for cheap at your local Goodwill or Thrift Store.  I do have frames stashed away, but picked up one at Goodwill anyway because I wanted one with a thin frame.

image001

Step 2:  Paint your frame

Remove the back and the glass and paint your frame. You can choose to spray paint or brush it on.  In this case, I brushed it on using a paint I had leftover from another project.

image003

Step 3: Paint the Glass with chalkboard paint

With the glass still removed from the frame, paint it with chalkboard paint following the directions on the can.  Remember to apply the paint as smoothly as possible so that it’s easy to write on with chalk.  Several coats are required to make it look like a chalkboard, especially on glass.

image002

Step 4:  Put it all together

When everything is dry (I waited several days), you can condition the chalkboard paint following the directions on the can, and put the frame, glass and backing together again.  Tada!  You have a super cute, customized chalkboard.

image004

Leave a comment »

Hosting on the Go – Hot Drink Bar to Go

We have friends that moved over the weekend.  Well, seeing as how we live in the Midwest, February decided to leave like a lion.  So, we had snow.  Although it made it a little inconvenient, it also made it pretty.  There is something magical about a neighborhood or a yard or a house in a soft, white blanket.  I knew it was going to be cold, so I asked if I could be in charge of providing hot drinks for everyone.  I also wanted to make it as convenient to transport as possible.  I decided on hot coffee and hot cider.  I always like to have options with drinks, so I came up with a few things you could add to these delicious choices.  I started with coffee.  The obvious choice to go with coffee is cream and sugar.  I chose sweet cream, since it’s basic and yummy.

Cream and Sugar and Spices
I then made my recipe for hot apple cider.  I let it warm in the slow cooker overnight and it turned out great!  For yummy little embellishments I included cinnamon sticks, ground nutmeg, and ground cloves.

Cinnamon Sticks

To keep everything warm, I put them in vintage thermos’ which I happen to collect.  I normally don’t do disposable cups, but for this purpose I did.  I included: cups with lids, a sharpie to write names on cups, napkins, hand sanitizer, and all of the stuff mentioned above.  I put everything in my easy-to-carry plastic Coca Cola crate and it turned out to be super convenient and added a little fun to the whole process.

Hot drink bar to goSpoons and marker

Here is a picture from their front door as the snow began to accumulate.

Friends Move

We made it home safe and sound and here is a picture of our backyard.

Back yard 2

A warm congrats to our friends from our old, country, farm house to your new, lovely home.  We wish you many years of happiness and wonderful memories.  We will always remember moving you in the cozy, wintery snow of a Midwest February.

Leave a comment »

Take Off Your Coat and Stay a While

I’m not winter’s biggest fan for so many reasons.  It’s cold, the days are short, the mornings are dark, it’s cold, the weather is often dreary, it’s cold… well, you get the idea.  But one of the biggest annoyances of winter is the need for coats.  I hate coats.  It’s just one more step to getting two kids out the door… actually, make it about 3 steps, when you count turning the coat right-side out, putting it on, then zipping it up.  And that doesn’t count hats and mittens.

And then, when we get home, the coats end up all over the place.  On the floor, the couch, the banister.  Of course, it doesn’t help matters that we didn’t have a coat rack.  I tried to corral the mess by putting a basket in the entryway just for coats, but it didn’t work extremely well.  Sometimes coats made it in the basket.  Mostly, it just looked like this:

20150103_115708

Nice.  So, finally, after years of living in this house, we added coat hooks in our entryway, and it ended up costing us nothing.

We had a perfect place:

20150103_115727

Look at all that empty wall space!

My husband had a board left over from some project or other, so he measured and cut it to size.  We also had coat hooks that we were going to use on another project that we didn’t ever complete, and some left over stain and polyurethane.  And so, we made this:

20150103_184928

And now, coats have a place off of the floor:

20150103_185158

Yay!  One more step in fulfilling my resolution to being more organized.

Leave a comment »

Wheel of Breakfast

Every year, I make the same short-term resolution (in addition to losing the holiday weight) – to get organized in January.  With all the Christmas decorations (a.k.a., Christmas clutter) taken down, and new stuff acquired not having a place, I feel the need to purge and organize.  This year, the first thing I tackled was the kitchen.

I have a pantry cabinet.  It’s very deep, so it holds a decent amount, but since it is so deep, you have to take everything out to get to things in the back.  It’s really annoying, especially in the morning when all you want is to have some oatmeal for breakfast.  So, I invested in a few turntables.  I was surprised that you can get them in all kinds of sizes, and they’re relatively inexpensive.  Here are the results:

Wheel of Breakfast!

The first shelf to get organized was the breakfast shelf.  No more pulling cereal boxes out to get to the oatmeal; just spin the turntable!  (My husband is the one who started calling it the “wheel of breakfast”.)

IMG_9553

Carousel of Cans

Next was the canned goods and beverages shelf.  Again – so much easier to get to things and to see what I have on hand!

IMG_9555

Snack-Go-Round

Finally, the snack shelf.  The kids had trouble pulling containers out to get to the snacks at the back, and they didn’t ever know what we had on hand, so this makes it much easier. This is actually in another cabinet, which is a little smaller than my pantry shelves, so this one was a 16-inch turntable, where the others were 18-inch turntables.

IMG_9559

These have worked out so well.  Whenever I look for ways to organize, I look for ways that are easy to keep up with, and these do the trick!

Leave a comment »

Countdown to Thanksgiving – 1 Day left!

With tomorrow being Thanksgiving, I’m sure you’ve gotten all your big stuff – turkey, sides, desserts – as prepped as they can be.  You may even have your house cleaned and table set.  Today’s post is about the little things that you may want to add to make Thanksgiving day even more special and entertaining.

Place Cards

If you have a seating arrangement for your gathering, instead of traditional place cards, why not do something a little more Thanksgiving-y.  For example, put a different Bible verse about thankfulness at each place setting.  Or, under the person’s name, write something you’re thankful for about them!

IMG_8946

Games

Why not fill some of the time you’re not eating delicious food with games?   Try the Thanksgiving Trivia sheet or Turkey Trivia.

For the Kids

Set out a turkey coloring sheet and crayons for a craft that requires minimal adult supervision, or, for something requiring a little more adult assistance, try the Grateful Turkey!


For more Thanksgiving ideas, check out our Pinterest board, The Pilgrim’s Hat!


Leave a comment »

Countdown to Thanksgiving – 3 days left!

A Thanksgiving Day Poll.

Leave a comment »